
Summarise this article with:
A single passport photo set costs $16.99 at Walgreens and $17.99 at CVS, and the post office charges $15. You can print the exact same photos at home or at a kiosk for about $0.15 to $0.35 a sheet, and you get unlimited retakes until the shot is right. Here is the full process, with the real sizes and the arithmetic for fitting multiple photos on one 4x6 print.
What You Need
- A smartphone camera (8MP or higher) or any modern digital camera
- A plain white or off-white wall, or a white sheet hung flat
- A photo printer with 4x6 glossy paper, or access to a print kiosk (Walgreens, Walmart, CVS)
- About 10 minutes
You do not need special software. Our Passport Photo Maker does the cropping and head sizing in the browser, and the Image Merger arranges the copies onto a 4x6 sheet.
Step 1: Take the Photo
- Stand 4 to 6 feet from a plain white wall so you do not cast a shadow on it
- Face a window for soft, even daylight, no harsh overhead light
- Neutral expression, mouth closed, eyes open, looking straight at the lens
- Remove glasses. The US State Department has banned eyeglasses in passport photos since November 2016, and most other countries follow the same rule
- Have someone else hold the camera at your eye level, or use a tripod and timer. Take 8 to 10 frames so you have options
The most common reasons a home photo gets rejected are shadows on the background, a tilted head, and uneven lighting on the face. Fixing those at capture time is far easier than fixing them later.
Step 2: Size and Crop to Your Country's Spec
Upload your best frame to the Passport Photo Maker and pick your country. The tool detects your face, then crops and resizes to the official dimensions with the head positioned correctly in the frame:
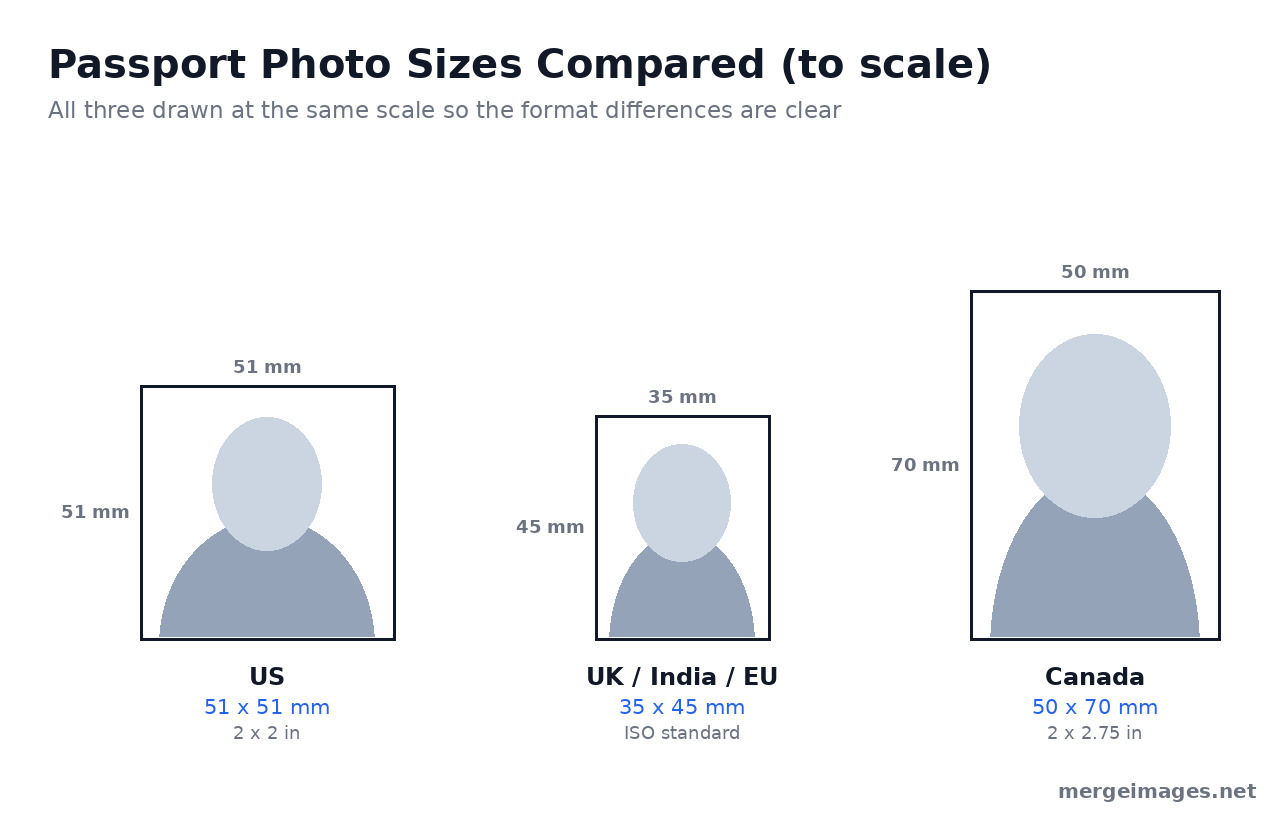
- US Passport: 2 x 2 inches (51 x 51 mm)
- UK Passport: 35 x 45 mm
- Canadian Passport: 50 x 70 mm
- Indian Passport: 35 x 45 mm
- Schengen Visa: 35 x 45 mm
One easy mistake: an Indian passport photo is 35 x 45 mm, but a US visa application from India needs the 2 x 2 inch (51 x 51 mm) size, and an OCI card uses 35 x 35 mm. Pick the exact document in the tool so you get the right crop.
The formats are easy to mix up, so here are the three common sizes drawn to scale next to each other.
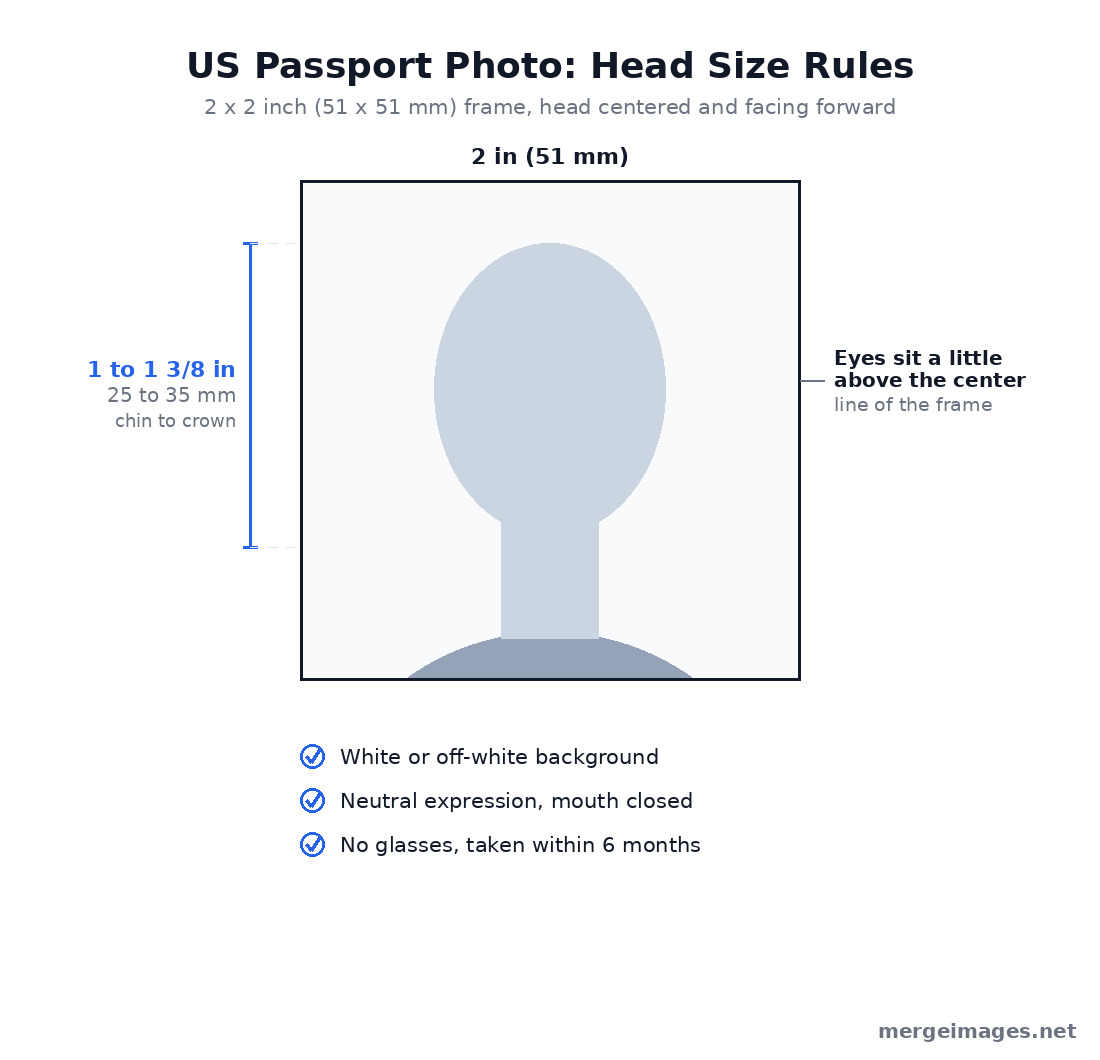
Head size is the spec people most often get wrong. For a US photo, the head from the bottom of the chin to the top of the head must measure between 1 inch and 1 3/8 inches (25 to 35 mm) inside the 2 x 2 inch frame, and the head must be centered. The tool handles this automatically, but it helps to know the target.
Two background notes worth knowing before you print. The UK no longer accepts a pure white background and asks for light grey or cream, so do not over-brighten your wall. Schengen and US photos accept plain white or off-white.
Step 3: Arrange Multiple Copies on a 4x6 Sheet
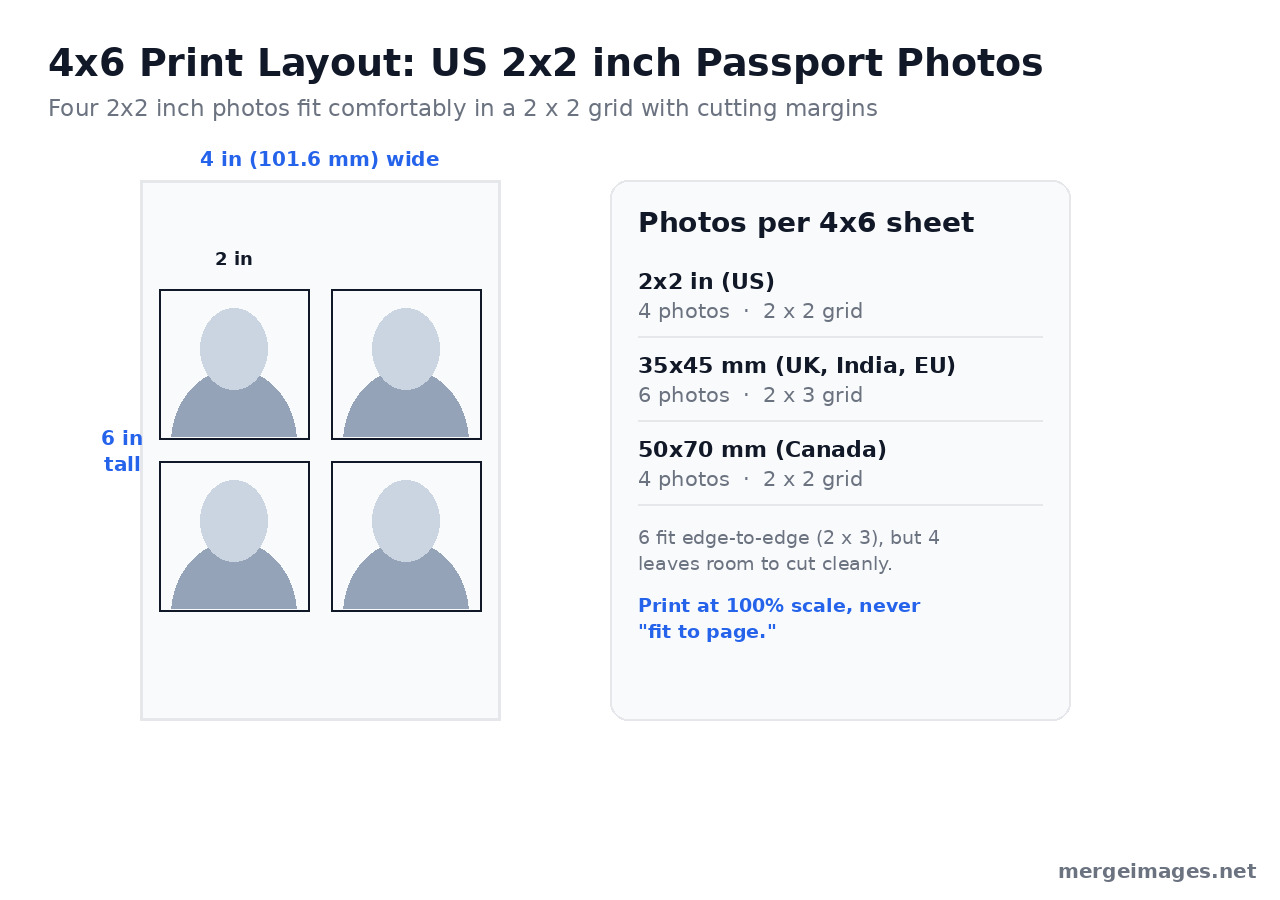
This is the trick that turns a $17 photo into a 30 cent one. A 4x6 inch print is large enough to hold several passport photos, so you print one sheet and cut out the copies you need. How many fit depends on the photo size:
| Photo Size | Photos per 4x6 | Arrangement |
|---|---|---|
| 2 x 2 inch (US) | 4 (6 if edge to edge) | 2 x 2 grid |
| 35 x 45 mm (UK, India, Schengen) | 6 | 2 x 3 grid |
| 50 x 70 mm (Canada) | 4 | 2 x 2 grid |
Here is the math behind the table so you can trust it. A 4x6 sheet is 101.6 x 152.4 mm. Four 2 x 2 inch photos sit in a clean 2 x 2 grid with room left over for cutting lines. You can squeeze in 6 (a 2 x 3 grid) if you butt them edge to edge, but a tiny printing or cutting error then ruins a photo, so 4 is the safer layout for most printers.
A note on Canada: 50 x 70 mm photos do fit four to a sheet, but Canadian passport applications must be taken by a commercial photographer and require two identical prints signed on the back by a guarantor. Print-at-home photos are not accepted for a Canadian passport, so use this layout only for Canadian visa or ID photos that allow it.
How to Build the Grid
- Download your correctly sized passport photo from the Passport Photo Maker
- Open the Image Merger and upload the same photo as many times as you need (4 copies for a US 2 x 2 sheet)
- Merge two copies horizontally to make the top row, then the next two for the bottom row
- Stack the two rows vertically to finish the 2 x 2 grid
- Set spacing to 2 or 3 pixels between photos, which gives you a thin cutting guide
If you would rather drag the copies into a grid visually, the Photo Collage Maker does the same job with a fixed grid layout and drag and drop. Either tool gives you a single 4x6 image ready to print.
Step 4: Print at the Right Size
The one setting that makes or breaks a home print is scale. Always print at 100 percent, actual size. Never let the printer or kiosk "fit to page" or "scale to fill," because that resizes your carefully cropped photo and throws the head measurement out of spec.
At Home
- Use glossy or matte photo paper, both are accepted; glossy is the more common choice
- Set the printer to its highest quality and 300 DPI or better
- Choose the 4x6 paper size and turn off any auto-fit or borderless scaling
- Load one sheet, print, and check the size with a ruler before printing more
At a Print Kiosk
- Save the merged 4x6 image to your phone, a USB drive, or an SD card
- Select "4x6 print" and decline any auto-crop, auto-enhance, or red-eye options
- Cost is roughly $0.15 to $0.35 per print at Walgreens, Walmart, or CVS
Online Print Services
- Upload to Shutterfly, Snapfish, or a similar lab and order 4x6 glossy prints
- Cost is around $0.09 to $0.15 per print plus shipping, so this only pays off if you order several
- Costco's photo print center closed in 2021, so it is no longer an option
Step 5: Cut Out Each Photo
Use a guillotine paper trimmer or a craft knife and a metal ruler for clean straight edges. Scissors work but are harder to keep square. Cut along the thin guide lines so each finished photo is exactly the right size. For a US photo, each cut piece should measure exactly 2 x 2 inches. Uneven or angled edges are a common rejection reason, so take your time here.
Cost Comparison
| Method | Cost | Time |
|---|---|---|
| CVS | $17.99 | About 1 hour with travel and wait |
| Walgreens | $16.99 | About 1 hour with travel and wait |
| Post Office | $15.00 | 30 to 60 min |
| Home printer | About $0.30 (paper and ink) | 10 min |
| Walmart kiosk print | $0.35 | 15 min |
| Online print service | $0.15 plus shipping | 3 to 5 days |
Savings: $15 or more per set, and you can reprint for free if a shot does not pass.
Tips for Acceptance
- Print on photo paper, never plain office paper. Matte or glossy is fine, plain paper is not
- Check your colors before printing. A yellow tint from low or old ink is an easy rejection, so run a test print first
- Use a recent photo, taken within the last 6 months
- If your source photo is small or soft, upscale it first so it stays crisp at print resolution
- Keep the background even and shadow free. If a stray shadow or clutter crept in, the Background Remover gives you a clean, uniform backdrop to drop the head onto
- Cut precisely. Wobbly edges and the wrong size are the two most common reasons home photos get bounced
The Bottom Line
Between the Passport Photo Maker for the crop and head sizing and the Image Merger for laying copies out on a 4x6 sheet, you can produce compliant passport photos at home for well under $0.50 a set. The real advantage is not just the money. You control the lighting, you check the result against the spec, and you reprint as many times as it takes to get a photo you are happy to carry for the next ten years.
Bello builds useful software and writes thoughtful content to make sense of it all. He tests the tools himself and checks the facts before any of it goes in a guide.
Try Our Free Image Tools
Ready to Try It?
Put these tips into practice with our free online image merger. No signup required.
Merge Images Now


