
Summarise this article with:
AI upscaling can turn a blurry 600 pixel portrait into a crisp 4K image without a subscription. We left simple pixel interpolation behind. Neural networks now reconstruct missing texture. Learn the knobs. Respect the limits. You get studio quality results from a free browser tool.
How AI Upscaling Works Under the Hood
Bilinear and bicubic methods just stretch pixels. You get a soft, smeared image with lost edges. AI upscalers train on millions of high resolution and low resolution pairs. Feed them a low res picture. The model predicts missing pixels and fills them in. Two families dominate today.
Photo: Google DeepMind via Pexels
GAN based models pit a generator against a discriminator. The generator creates the upscaled output. The discriminator judges realism. This tug of war pushes toward sharper edges and believable textures. Most fast upscalers belong here. They run fast enough for batch jobs. They handle everyday photos well. Diffusion based models start from noise. They iteratively denoise toward a high resolution result. The process is slower. It recovers finer grain. This makes it ideal for art prints or archival restoration.
Both share a limitation. They cannot conjure detail that never existed. A pixel poor scan of a 1930s portrait will never become a flawless studio shot. The AI can smooth jagged edges, though. It restores subtle skin tones. It makes the image look natural at larger sizes.
Precision Mode vs. Creative Mode
Most free upscalers, including MergeImages, expose a precision toggle. Precision mode limits creative embellishment. It preserves the original look while sharpening edges. Creative mode lets the model add stylized texture. This is useful for AI generated art but risky for product photography. Logos and text must stay exact there.
Choose Precision for faces, passports, and factual fidelity. Skin texture stays true. Text remains legible. Choose Creative for landscape panoramas or abstract art. A touch of painterly flair enhances the visual impact. Start with precision for clean results. If the output feels flat, switch to creative for a single pass and compare.
Practical Testing Workflow
Start with a 600 pixel wide low resolution version of the final high resolution file. This size uploads instantly. It is large enough to reveal how the model reconstructs fine detail. Upload to the AI Image Upscaler. Select the 2x scale. Choose Standard for speed. The watermarked preview arrives in seconds. Zoom into the eyes and the edge of a necklace. The texture should look natural. No halo should appear around the hair.
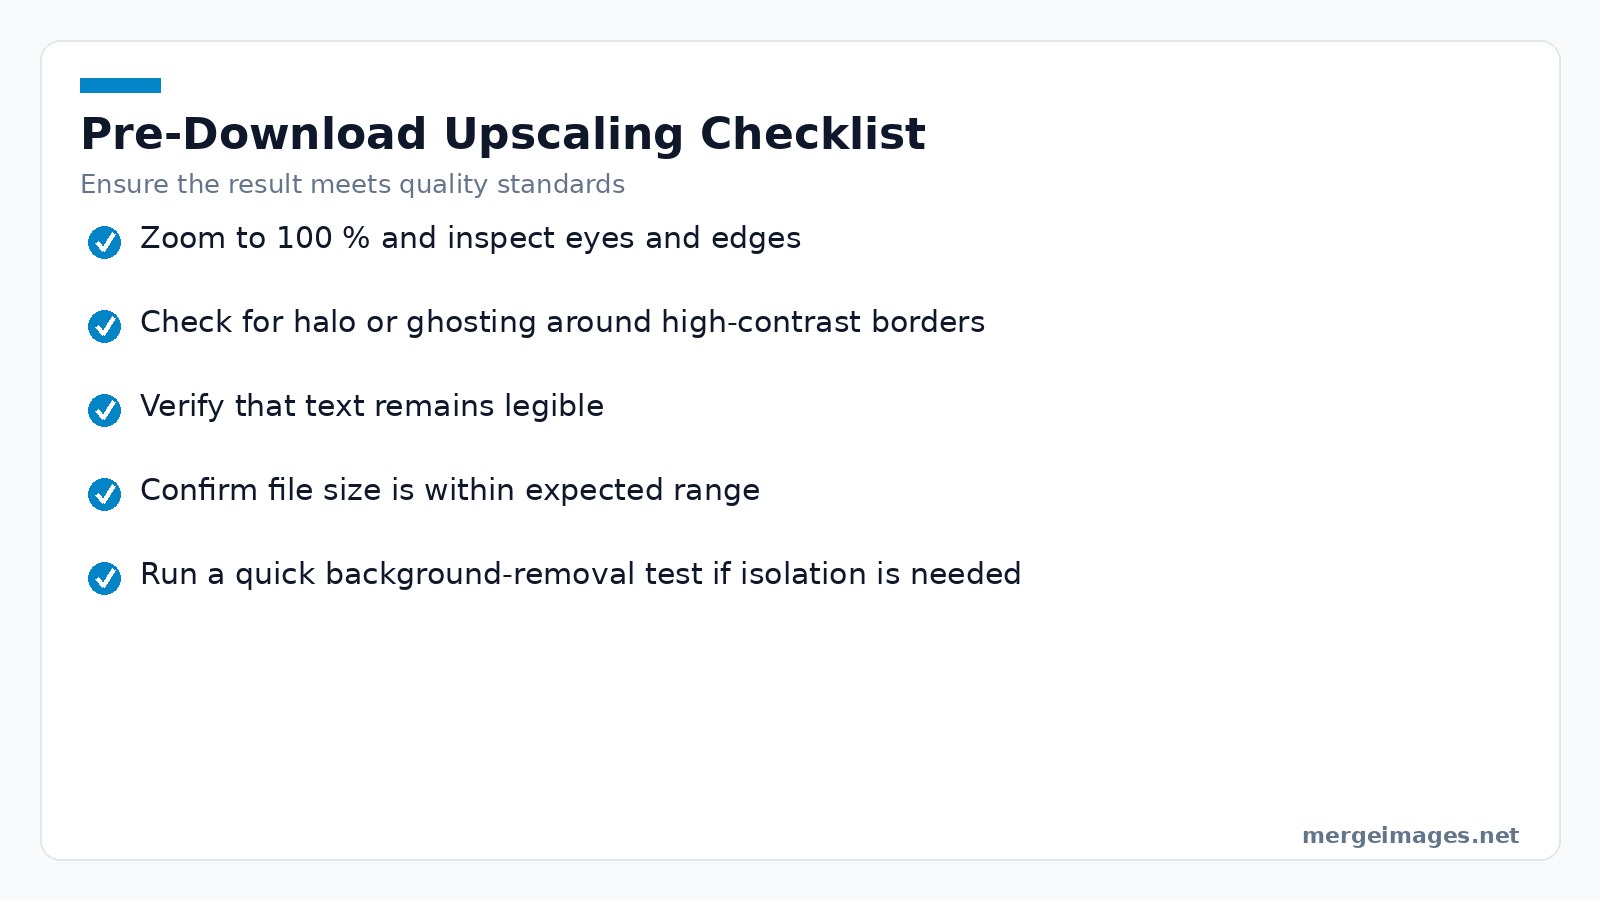
If the preview passes, hit Download. Run the same file through the Background Remover. Stripping the background isolates the subject. It reduces file size. It gives the upscaler a cleaner canvas for the next pass. Use the Image Cropper to trim excess sky. This keeps the upscale focused on the subject. This three step loop is my go to recipe for old family photos.
Common Pitfalls and When Not to Upscale
Watch out for text and logos. AI can subtly reshape characters. It might turn a Nike swoosh into a different curve. For e commerce, always start with the highest resolution source. Never rely on AI to preserve brand marks.
Grass and foliage cause trouble. Upscaling mountain scenes usually adds realistic rock detail. Dense grass can turn into a smudged carpet. Inspect the result at 100% zoom. If blades blur together, downgrade to 2x or stay with the original.
Mind large file blow up. An 113MB PNG can balloon to several hundred megabytes after a 4x upscale. Store the result in WebP to share online. Compress with the Image Compressor before distribution.
Skip AI for motion heavy video frames. Fast moving game screenshots may introduce ghosting. Test a single frame first. If you see trailing edges, consider spatial upscaling like FSR instead of AI.
Deep Dive into Model Failures
Even the most polished models have blind spots. When the input contains strong compression artifacts, the network may amplify them instead of cleaning them. A practical remedy is to run the image through a dedicated de-noise filter before upscaling. This adds a small processing step but often yields a cleaner final result.
Another frequent failure mode appears with repetitive patterns such as brick walls or tiled floors. The model sometimes invents a new brick layout that does not line up with the original geometry, producing a “wavy” appearance. To mitigate this, crop the area to a multiple of the original tile size or manually mask the pattern and upscale it separately.
Low-light photos present a different challenge. The network tries to fill in missing luminance information, which can lead to a washed-out look or color shifting. In practice, brighten the image modestly in a photo editor, then feed the adjusted file to the upscaler. After scaling, you can bring the contrast back down to the desired level.
Finally, remember that AI upscaling is not a magic fix for extreme resolution gaps. Upscaling a 100×100 thumbnail to 4K will inevitably produce a soft result because the model has very little real data to extrapolate from. In such cases, treat the output as a visual aid rather than a final product.
Performance and File Size Considerations
AI upscaling is computationally heavier than bilinear filtering. A 1080p to 4K pass consumes roughly three times the GPU cycles of a 720p to 1080p upscale. A 5 second GAN upscale feels snappy on a mid range laptop. A diffusion model can linger for 30seconds or more.
File size grows roughly with the square of the scale factor. Upscaling a 1200×800 JPEG at 2x typically yields a 2.5MB file. A 4x upscale can exceed 10MB. If bandwidth is a concern, run the result through the Image Compressor. Target a 500KB ceiling for web use.
Choosing the Right Tool on MergeImages
| Filter Type | Typical Use | Pros | Cons |
|---|---|---|---|
| Bilinear | Quick thumbnails | Instant | Noticeable blur |
| Trilinear | Mobile games | Slightly sharper | Still soft |
| Anisotropic | Open-world textures | Clear edges at angles | Minor GPU cost |
| AI Precision Upscale | Portraits, passports | Preserves factual detail | Limited creative flair |
| AI Creative Upscale | Landscapes, art | Adds texture | May alter text |
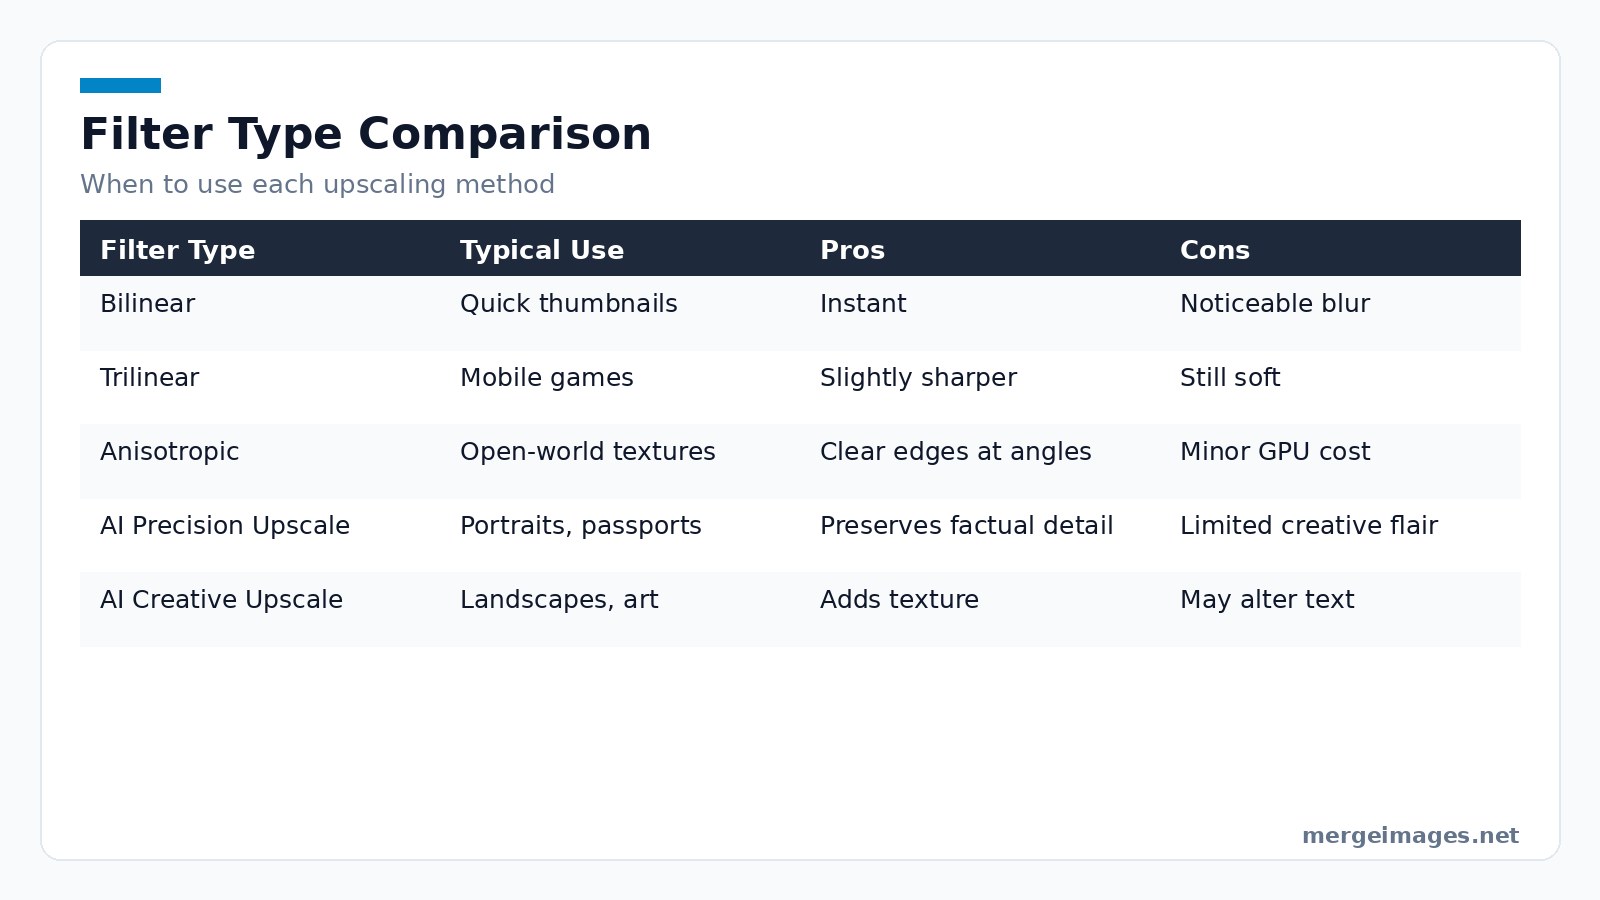
When you need a factual result, click Precision in the upscaler. For artistic projects, toggle Creative. For faces and rich textures, try HD at 4x. Always finish with a download. There is no watermark and no paywall, so the full-resolution file is yours straight away.
Step by Step Walkthrough
- Upload Drag your JPEG or PNG onto the AI Image Upscaler page.
- Select Scale Choose 2x for photos larger than 1000px. Choose 4x only if you need print size detail.
- Pick Quality Start with Standard for speed. Switch to HD at 4x if you need maximum fidelity.
- Toggle Mode Enable Precision for faces or text. Enable Creative for scenery.
- Preview The watermarked preview appears in under 5seconds for most images. Zoom in on critical areas.
- Download Click the download button. The file arrives unwatermarked.
- Optional Cleanup Run the result through Background Remover to isolate subjects. Then use Image Cropper to discard unwanted edges.
- Compress If the file is too large, use Image Compressor to hit your target size.
These steps keep your workflow fast and reproducible.
Frequently Asked Questions
What is the difference between 2x and 4x upscaling?
2x doubles each dimension. This results in four times the pixel count. 4x quadruples each dimension. This yields sixteen times the pixels. Larger scales add detail. They also increase processing time and file size.
Does AI upscaling work on PNGs with transparency?
Yes. Upload a PNG with an alpha channel. The upscaler preserves transparency. Download the enlarged PNG directly after scaling.
Can I use the upscaler for video frames?
You can process individual frames. The tool is not optimized for batch video, though. Export frames. Upscale them one by one. Reassemble with your video editor.
How does precision mode prevent artifacts?
Precision limits the creative leeway of the model. It forces reliance on patterns seen in the source image. This reduces the risk of hallucinated textures. It protects text and facial features.
Is there a limit to how large an image I can upscale?
The free browser version accepts files up to 25MB. Very large dimensions may stall the browser. Crop or resize first with an external tool in that case.

Bello builds useful software and writes thoughtful content to make sense of it all. He tests the tools himself and checks the facts before any of it goes in a guide.
Try Our Free Image Tools
Ready to Try It?
Put these tips into practice with our free online image merger. No signup required.
Merge Images Now


