
Summarise this article with:
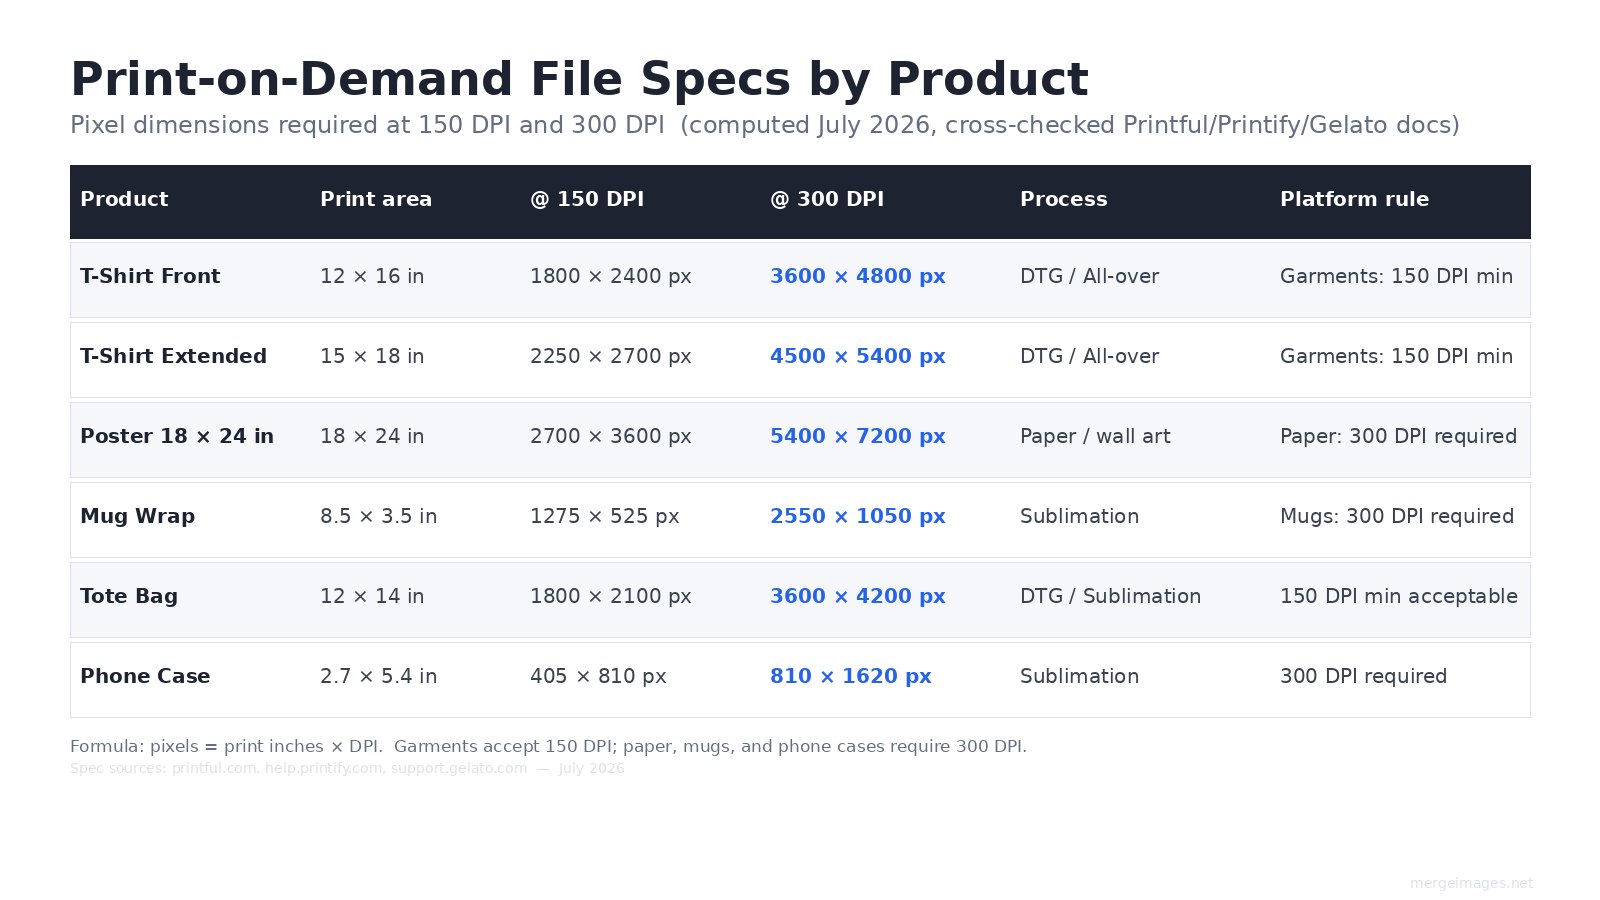
For a standard 12x16 inch t-shirt front, you need a design file of 3600x4800 pixels at 300 DPI, or 1800x2400 pixels at the minimum 150 DPI Printful and Gelato accept for garments. Paper products, mugs, and phone cases all require 300 DPI. Your production file and your listing mockup are two distinct files with different requirements.
Sellers who treat mockups as an afterthought end up with an invisible product in search grids. I've seen the same design sell twice as well after a mockup rebuild, simply because the thumbnail finally showed what the design actually looked like at 200px wide. Start with the file specs, then work your way to the live listing.
Step 1: Prepare Your Design File to the Right Spec
Get the pixel math right before touching any mockup tool. The formula is simple: pixels = print inches x DPI. For garments, Printful, Printify, and Gelato all accept a minimum of 150 DPI. For paper products, mugs, phone cases, and stickers, 300 DPI is required by all three platforms (checked July 2026, cross-referenced against their help documentation).
This means a standard 12x16 inch t-shirt front area needs:
- 1800x2400 px at 150 DPI (minimum accepted)
- 3600x4800 px at 300 DPI (recommended for sharper output)
For an 18x24 inch poster, that jumps to 5400x7200 px at 300 DPI. If you are working from a lower-resolution source file, Printify notes that it will attempt to auto-enhance before sending to production, but uploading at full resolution from the start avoids relying on that fallback.
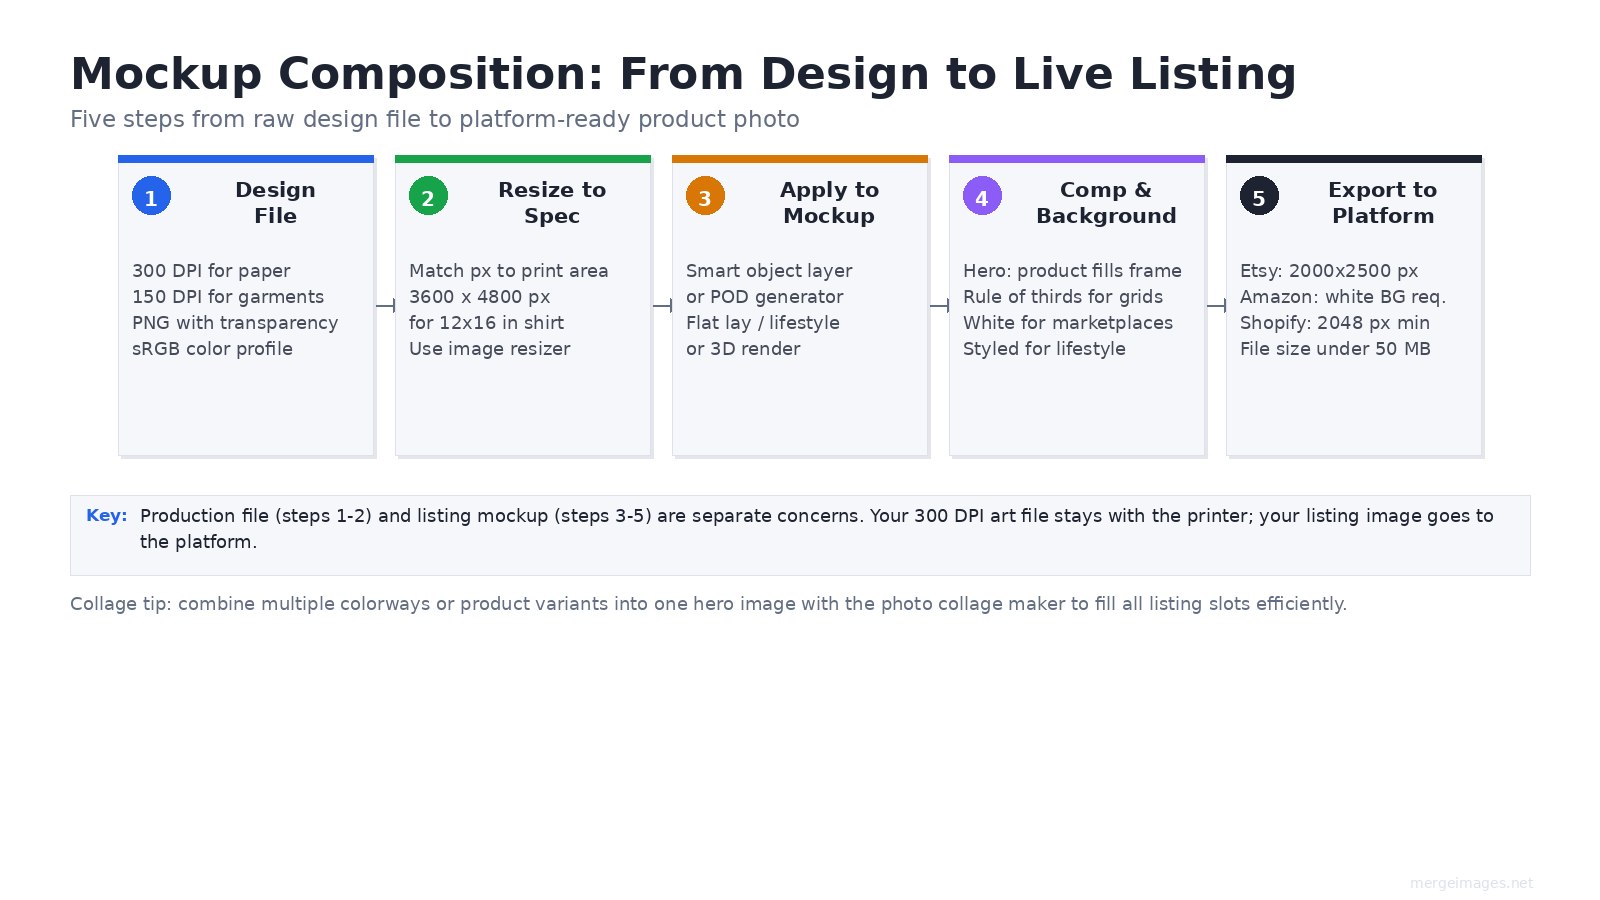
Use PNG with transparency for design elements that need clean edges on the product. Set your color profile to sRGB, not CMYK. All three major POD platforms work in RGB for their web-to-print pipeline.
Use the image resizer to hit exact pixel targets before uploading to your POD platform's mockup generator.
Step 2: Choose the Right Mockup Type for the Product
Different products convert better with different presentation styles. There is no single correct mockup approach.
Flat lay mockups work well for folded or laid-out products: tote bags, notebooks, blankets, and apparel shown styled rather than worn. They are consistent and easy to batch-produce. The limitation is that flat lays do not show wearability or three-dimensionality.
Lifestyle mockups with a model or staged environment answer the "will this work for me?" question directly. For wearables and home goods, this is typically the highest-converting presentation because it reduces buyer uncertainty. The quality gap between a good lifestyle mockup and a bad composite is visible instantly to buyers.
3D rendered mockups generated by platform tools (Printful's built-in generator, Placeit, Mockup World) apply your design to a photorealistic model. These have improved substantially and are now hard to distinguish from real photography for most product types. They have the advantage of being easily updated when you change colorways.
Ghost mannequin mockups give apparel the shape of being worn without a visible model. Common in fashion e-commerce and useful when you want the garment to be the focus without buyer attention splitting toward a model's face.
Step 3: Compose the Hero Image
Your hero image appears in search grids, shared links, and mobile thumbnails at roughly 200px wide. At that size, a small design floating on a large background disappears. Zoom in further than feels comfortable at full size.
Composition principles that actually matter at small sizes:
- Product fills the frame. Do not crop the product, but reduce the margin until the design is legible at thumbnail size. Test by resizing your exported mockup to 200px wide before publishing.
- Rule of thirds over dead center. For individual product shots, centering works. For catalog grids and multi-image layouts, offsetting the product creates a more dynamic composition and lets you vary shots across a listing's image set.
- One clear story per image. Your hero shows the product. The second image shows it in use. The third shows a detail or the design close-up. The fourth shows scale. Do not try to put all of that information in the hero.
For background choice:
| Background type | Best for | Avoid when |
|---|---|---|
| Pure white | Marketplace primary images | Product is white or very light |
| Styled surface (wood, linen, marble) | Premium / lifestyle feel | Background fights product colors |
| Lifestyle / room setting | Wearables, home goods, gifts | Image quality is noticeably lower than product |
| Transparent / PNG | Stickers, decals, overlays | Category expects a solid product environment |
Step 4: Build Multi-Image Listings Systematically
Use every available image slot. Etsy allows up to 10 photos per listing. Listings that use more slots outperform those that use fewer, because they answer more buyer questions before the purchase decision.
A strong slot structure for a wearable product:
- Hero: clean product shot, design dominant
- Worn / in-use: lifestyle mockup
- Design detail: tight crop on the key graphic element
- Size reference: the product with a size-scale object or size chart overlay
- Color variant: same design in an alternate colorway
- Flat lay: editorial styled version
When you have multiple colorways or related products, the photo collage maker lets you build a single collage hero that shows all variants at once. This is particularly useful for listing slots that want to show range without requiring a buyer to flip between separate listings.
Step 5: Export to Platform-Specific Sizes
Every platform has different requirements. These were verified against platform documentation in July 2026.
Etsy: Recommended size is 2000x2500 px (4:5 ratio), with a minimum of 2000px on the longest side. Maximum file size is 50 MB. JPEG, PNG, or GIF accepted. The 4:5 portrait ratio displays well in Etsy's grid without cropping.
Amazon: The primary image must have a pure white (#FFFFFF) background. No text, watermarks, or additional graphics on the primary image. Product must fill at least 85% of the frame. Secondary images can be lifestyle, infographic, or detail shots. Amazon enforces these standards and will suppress listings that do not comply.
Shopify: Recommend at least 2048px on the longest side to enable the zoom feature. Square (1:1) or slightly portrait (3:4) images work best for consistent grid display across themes. Consistent aspect ratio across all product images in a store matters more than optimizing any individual shot.
Redbubble and Society6: These platforms apply your design file to multiple product types automatically. Upload the highest resolution design file you can produce. Both platforms provide placement templates; use them to verify where your design will land on each product type before publishing.
For preparing images at exact platform dimensions, the image resizer handles custom pixel targets for any platform. See also how to prepare images for printing for guidance on print-specific color profiles and file formats.
Color Accuracy and Production Files
What looks correct on screen often prints differently. POD uses sRGB for the web-to-print workflow, but printer processes, substrates, and ink types introduce variation. A design that looks vivid on screen may come out slightly muted on a DTG-printed garment.
Best practices that actually help:
- Order a physical sample for any product you plan to sell at volume. Photograph it next to your mockup reference on the same background. If the color differs visibly, note it in your listing description.
- Stick to sRGB color profiles for all design and mockup files. Never upload CMYK files to POD platforms.
- Avoid very small text or fine line detail on garments printed via DTG. The resolution minimum of 150 DPI limits fine detail at small sizes.
A/B Testing Mockups
POD is one of the few product categories where listing images can be changed without touching the physical product. Sellers who test images systematically find meaningful variation in conversion across different presentation styles.
Test one variable per experiment and measure over at least 2 weeks before drawing a conclusion:
- Background (white vs. styled surface)
- Presentation style (flat lay vs. lifestyle vs. model)
- Composition (centered vs. offset)
- Hero image selection (front-facing design vs. detail shot vs. worn)
The how to create before and after photos guide covers side-by-side comparison techniques that also apply to showing mockup variations within a single listing image.
Frequently Asked Questions
What DPI do I need for print-on-demand designs?
It depends on the product type. Garments (t-shirts, tote bags, hoodies) require a minimum of 150 DPI at the intended print size on Printful, Printify, and Gelato. Paper products (posters, greeting cards, wall art), mugs, and phone cases require 300 DPI. When in doubt, produce at 300 DPI so the same file works across all product categories.
What pixel size do I need for a 12x16 inch t-shirt print?
At 150 DPI (garment minimum): 1800x2400 pixels. At 300 DPI (recommended for sharper output): 3600x4800 pixels. The formula is always print inches multiplied by your target DPI. These numbers were computed directly and cross-checked against Printful's product templates in July 2026.
How many listing images should I include per POD product?
Use every slot the platform allows. Etsy allows 10 photos plus one video. A complete image set covers the hero product shot, a lifestyle or worn view, a design detail close-up, a size reference, at least one colorway variant, and a styled flat lay. Listings that answer more buyer questions before the purchase decision consistently outperform those with fewer images.
Should I use a mockup generator or create my own mockups?
Both approaches have a place. POD platform generators (Printful, Printify) apply your design accurately to the exact product being sold, which removes any guesswork about placement. Third-party tools like Placeit offer more varied environments and lifestyle contexts. For advanced needs, Photoshop smart objects let you update one design file and have it propagate to every mockup variant at once.
What background color should I use for Etsy vs. Amazon?
Amazon requires pure white (#FFFFFF) for the primary listing image, with the product filling at least 85% of the frame. Etsy has no background color mandate for primary images, and styled or lifestyle backgrounds often perform well there. For Etsy, test your specific product: some categories (home goods, gifts) respond better to lifestyle backgrounds; some (print apparel) convert well on white.
Does the listing mockup image need to meet the same DPI as my print file?
No. The production file (what you send to the printer) and the listing mockup image (what buyers see on the platform) are separate files with separate requirements. Your 300 DPI art file goes to the printer. Your listing image needs to meet the platform's pixel dimension requirements (e.g., 2000x2500 px for Etsy) regardless of its DPI metadata. What matters for listing images is pixel count, not DPI metadata.

Bello builds useful software and writes thoughtful content to make sense of it all. He tests the tools himself and checks the facts before any of it goes in a guide.
Essayez Nos Outils d'Image Gratuits
Prêt à Essayer ?
Mettez ces conseils en pratique avec notre outil de fusion d'images en ligne gratuit. Sans inscription.
Clean up your images, free


