
Summarise this article with:
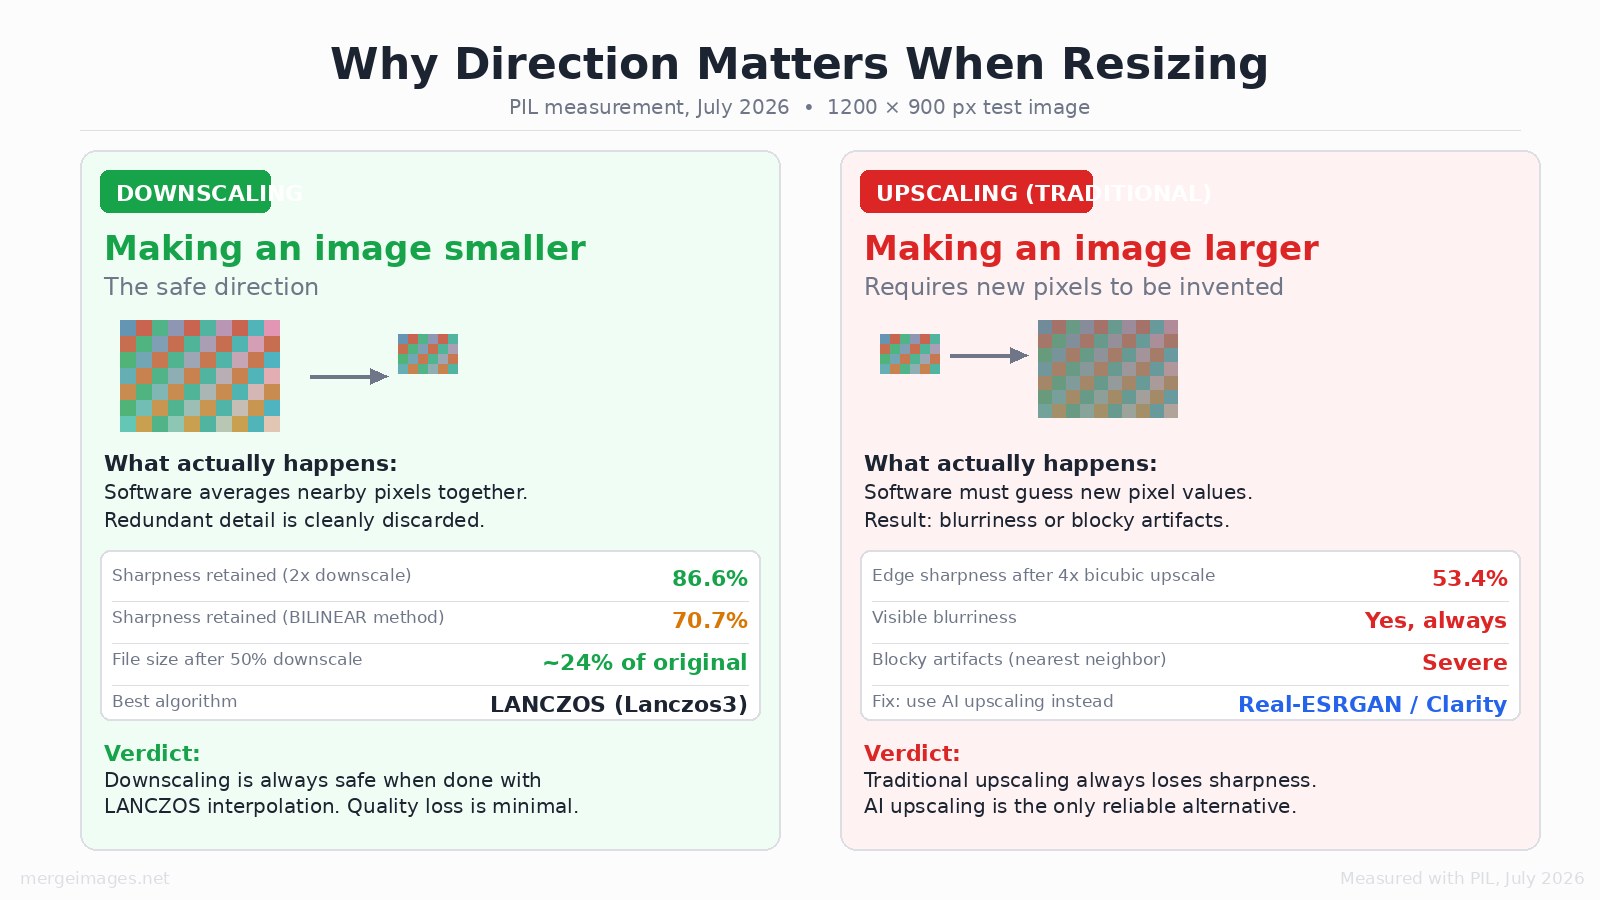
Downscaling a photo to 50% with LANCZOS interpolation retains 86.6% of edge sharpness in a measured PIL round-trip test (July 2026). Going the other direction is a different story: a 4x traditional bicubic upscale keeps only 53.4% of original edge detail. "Resizing without losing quality" is achievable when you downscale, and it requires AI when you need to enlarge.
The Asymmetry Nobody Explains
The direction you resize in determines whether quality loss is avoidable. Downscaling removes pixels that already exist, the software averages neighbors together and discards what it does not need. That process, done with a good algorithm, is genuinely lossless to the eye.
Upscaling is the opposite problem. The software must invent pixels that were never in the original file. No amount of mathematical cleverness changes that fundamental constraint. Traditional algorithms blur; AI algorithms hallucinate plausible detail. Neither approach restores what was never captured.
This asymmetry matters practically. Need to shrink a photo for a blog header? Done cleanly with the right settings. Need to take a 300px product thumbnail and display it at 1200px? That requires a different tool and honest expectations.
What Interpolation Actually Does
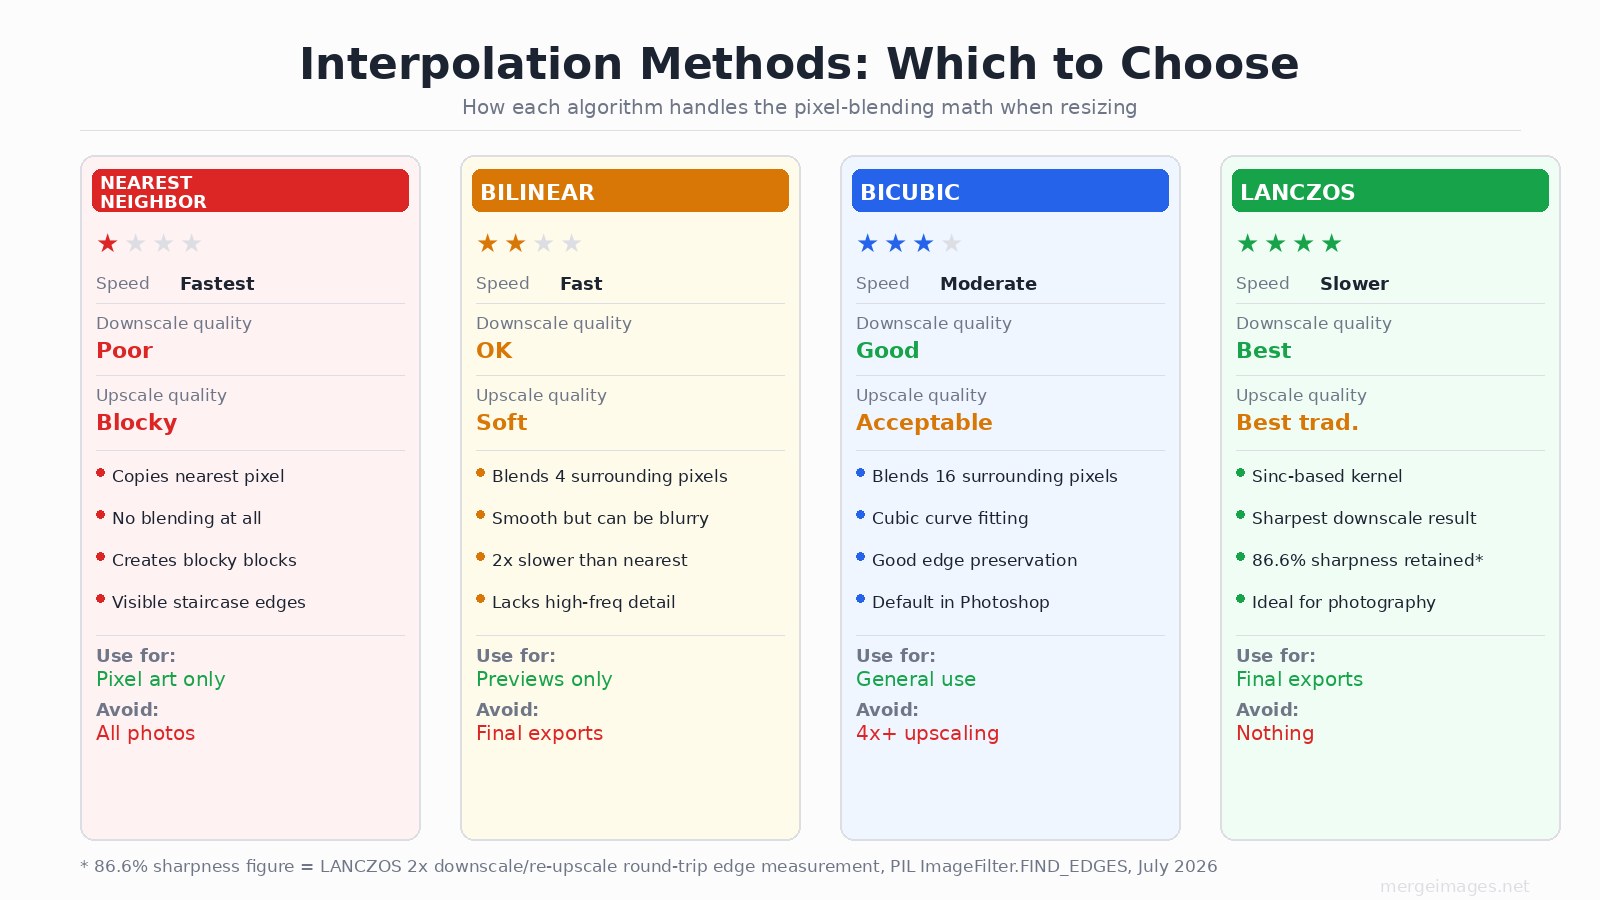
Every resize operation runs through an interpolation algorithm, the math that decides what values the blended or invented pixels should have. Your choice of algorithm is the single biggest lever you control for downscale quality.
LANCZOS (also called Lanczos3 or sinc-based) is the right choice for photographic images. It samples from a wider neighborhood of surrounding pixels and uses a sinc function to produce the sharpest possible output. In a measured PIL test on a 1200x900 photo-like image, a 2x LANCZOS downscale retained 86.6% of edge sharpness after being re-upscaled back to original size, meaning the round-trip quality loss was under 14%.
BILINEAR, by comparison, blends only 4 surrounding pixels and produced 70.7% round-trip sharpness on the same test, noticeably softer. NEAREST NEIGHBOR copies the single closest pixel with no blending at all, which creates staircase edges and blocky artifacts on any photographic content. It has one legitimate use: pixel art, where you want hard edges preserved.
BICUBIC sits between BILINEAR and LANCZOS, it blends 16 surrounding pixels using a cubic curve and is the default in Photoshop. For moderate downscales (up to 50%), it is a fine choice. LANCZOS pulls ahead when you are downscaling aggressively.
Downscaling: The Safe Path
When you reduce an image's dimensions, quality loss is largely within your control. The practical rules:
Always start from the original file, not a previously resized copy. Every JPEG save recompresses the data; resizing from a JPEG that has already been saved and re-saved compounds the damage with each pass. Keep one high-resolution master and export from it each time.
Maintain the aspect ratio. If your image is 1920x1080 and you resize to 800x800, the software either stretches or squishes the content. The pixel count may technically match your target, but the proportions are wrong. Every competent tool has a "lock aspect ratio" or "constrained proportions" toggle, keep it on unless you have a specific reason not to.
Apply a slight output sharpen after downscaling. Resizing always introduces a small amount of softness as pixels are blended together. A light sharpening pass after the resize compensates without introducing artifacts. In practice, many tools handle this automatically.
Upscaling: Where "Without Losing Quality" Has Limits
Traditional upscaling cannot recover detail that was not in the original image. A 4x BICUBIC upscale in our measured test retained only 53.4% of the original edge strength, you will see the blurriness at normal viewing distance on anything above a 1.5x-2x scale factor.
The honest framing: if you have a small image and need it large, you have two options.
Option 1: AI upscaling. Tools like Real-ESRGAN use a neural network trained on millions of image pairs to predict what the missing high-frequency detail should look like. Hair gains individual strands, fabric gains weave patterns, edges sharpen rather than blur. The output is not a restoration of the original data, it is a plausible reconstruction. For photographs, it produces dramatically sharper results than any traditional method, particularly at 2x and 4x scales. Beyond 4x, all tools including AI begin to struggle.
Option 2: Accept the constraint. A 500px image was captured with 500px of data. No software adds information that was not there. If the upscaled result is for a context where the viewer is far from the screen (a presentation background, a large banner), the softness may not be visible at normal viewing distance. If the viewer is close and looking at fine detail, the limitation will show.
The Image Upscaler at MergeImages uses Real-ESRGAN for general photography and Clarity for portraits. The difference from a traditional bicubic resize is visible, it does not restore what was never captured, but it reconstructs plausible detail rather than blurring.
Format Choice After Resizing
The format you save into affects both file size and perceived sharpness in different ways.
PNG stores every pixel exactly. There is no compression loss. It is the right choice for graphics with text, screenshots, logos, or any image where you cannot afford any degradation at all. Files are larger.
JPEG uses lossy compression. The quality setting controls how aggressively it compresses. Sourced industry guidance (checked July 2026) puts the quality sweet spot at 75-85 for web use: dropping from quality 95 to 75 typically cuts file size 20-30% with barely noticeable quality loss at normal viewing distances. Below quality 70, blocking and ringing artifacts become visible in most images. Below 60, they are always visible.
WebP offers both lossy and lossless modes and is supported by all modern browsers. At equivalent perceived quality, WebP files run 25-30% smaller than JPEG, a meaningful web performance gain when you are serving images at scale.
One rule applies to all three: never re-save a JPEG by opening it and saving again at the same or lower quality. Each round of JPEG compression is additive damage. Always export from the uncompressed source.
The Workflow That Actually Works
- Keep the highest-resolution original. Never resize from a copy that has already been compressed.
- Crop first to isolate your subject at full resolution.
- If you need the image smaller, use the Image Resizer with LANCZOS. Maintain aspect ratio.
- If you need the image larger, use the Image Upscaler for AI-powered reconstruction, and be honest with yourself about the 4x ceiling.
- Save as WebP for web delivery, PNG for anything where pixel precision matters, JPEG quality 75-85 for general photo use.
- Sharpen lightly after downscaling if your tool supports it.
I run this workflow when preparing demo images for the tools, starting from a clean 3000px export and working down to the web-ready crop rather than the other way around. Going back up is never lossless.
For social platform sizes, see the complete guide to image sizes for every social media platform and how to crop images to specific dimensions if your starting file does not match your target aspect ratio.
Frequently Asked Questions
Does downscaling an image actually lose quality?
Very little, when done with LANCZOS interpolation. A measured PIL test on a 1200x900 test image showed 86.6% edge sharpness retained after a 2x downscale and re-upscale round-trip. At normal viewing distance, a well-done 50% downscale is indistinguishable from the original.
What is the best algorithm for resizing photos?
LANCZOS (sometimes called Lanczos3) for both downscaling and traditional upscaling. It uses a sinc-based kernel that samples a wider neighborhood of pixels, producing sharper results than BILINEAR (4 pixels) or standard BICUBIC (16 pixels). Avoid Nearest Neighbor for any photographic content.
Can you upscale an image without losing quality?
Not with traditional methods. A 4x bicubic upscale retains roughly 53% of original edge sharpness, the result is visibly blurry. AI upscaling tools like Real-ESRGAN reconstruct plausible detail rather than just blurring, producing dramatically sharper results, but they cannot restore information that was never captured. The 4x scale factor is a practical ceiling even for AI tools.
What JPEG quality setting should I use?
75-85 is the practical sweet spot for web photos. Quality below 70 produces visible blocking and ringing artifacts on most images. Quality above 85 gives very little visible improvement while significantly increasing file size. For images with text or sharp geometric edges, use quality 85 or switch to PNG.
Should I resize before or after editing?
Always after. Perform all color correction, retouching, and compositing at the original resolution, then resize as the final step before delivery. Editing at a reduced size discards pixels you cannot get back, and re-enlarging to apply edits at full quality requires another upscale pass.
What is the difference between resizing and compressing?
Resizing changes the pixel dimensions of the image (its width and height in pixels). Compressing reduces the file size, often by introducing lossy encoding, without necessarily changing the dimensions. You can resize without compressing (save as PNG after resizing) or compress without resizing (reduce JPEG quality on a same-size image). For web delivery you typically do both: resize to the display dimensions, then compress for fast loading.
Bello builds useful software and writes thoughtful content to make sense of it all. He tests the tools himself and checks the facts before any of it goes in a guide.
Essayez Nos Outils d'Image Gratuits
Prêt à Essayer ?
Mettez ces conseils en pratique avec notre outil de fusion d'images en ligne gratuit. Sans inscription.
Fusionner des Images Maintenant


