
Summarise this article with:
Answer Capsule
A polished fashion lookbook starts with disciplined shooting and ends with precise image merging. Use a single hard edge light at half power, a 50mm prime, ISO125, f/8, 1/125s. Resize each shot with our free image resizer before building a grid in the photo collage maker. Expect 45 minutes per outfit.
Crafting the Mood with Light
Hard light delivers the gritty editorial edge minimalist brands crave. Put the grid equipped light slightly above the model. Think late afternoon sun slipping through a loft window. Keep the output around one quarter power. Shadows stay defined. Highlights never blow out. Before the first click, test a single pose. Adjust the lamp distance until the shoulder line falls cleanly into the dark. A small extension cable lets you tweak power from the floor. Your hands stay free for camera adjustments.
Watch the fabric folds under the harsh beam when the model wears an oversized blazer. The light carves the lapels. It reveals the intended silhouette. Move the light a few inches left or right if spill threatens to flatten the background. One degree rescues a whole composition. Pitfalls? A wide light spread washes out texture. Bounce introduces unwanted color casts. Add a barn door or flag to tighten the beam.
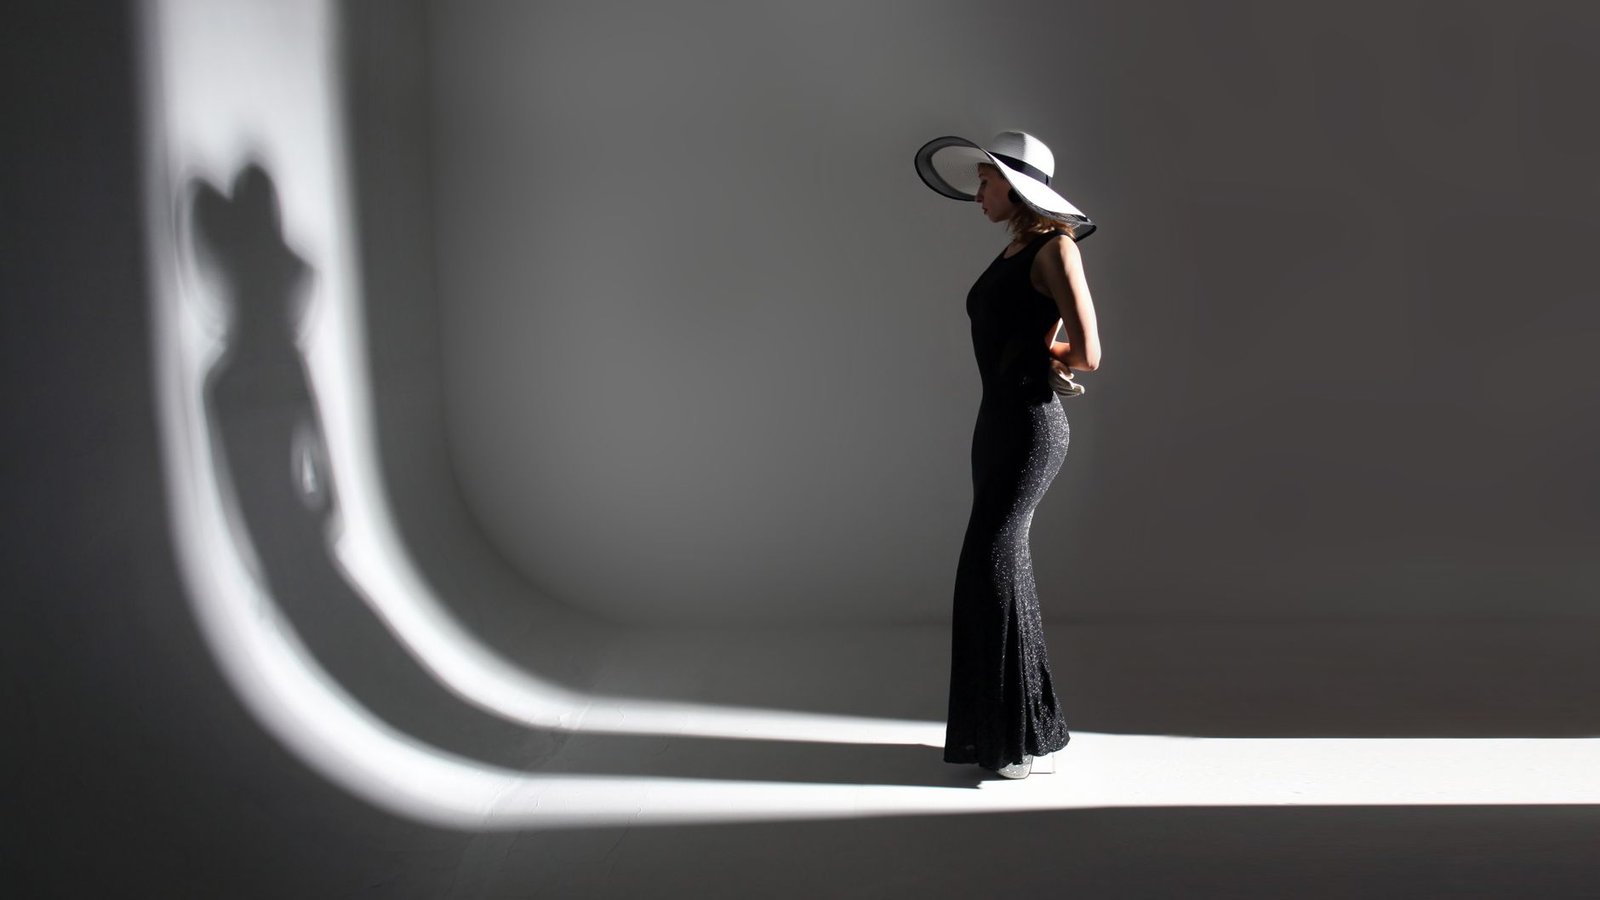
Photo: Vika Glitter via Pexels
Lens Choice and Camera Settings
A 50mm prime delivers a natural perspective that flatters most body types while preserving garment detail. Mount the camera on a sturdy tripod. This kills subtle distortion when you step forward or back for tighter framing. Keep ISO low. ISO125 is ideal for daylight balanced studios. You avoid grain that competes with fabric texture.
Aperture at f/8 offers enough depth of field to keep the entire outfit crisp from shoes to cuffs. Pair this with a shutter speed of 1/125s. Fast enough to freeze subtle movement. Slow enough to allow proper exposure under half power light. Shift to an outdoor street backdrop? Raise ISO to 200 and open the aperture to f/5.6. Retain the same shutter speed to keep motion blur at bay.
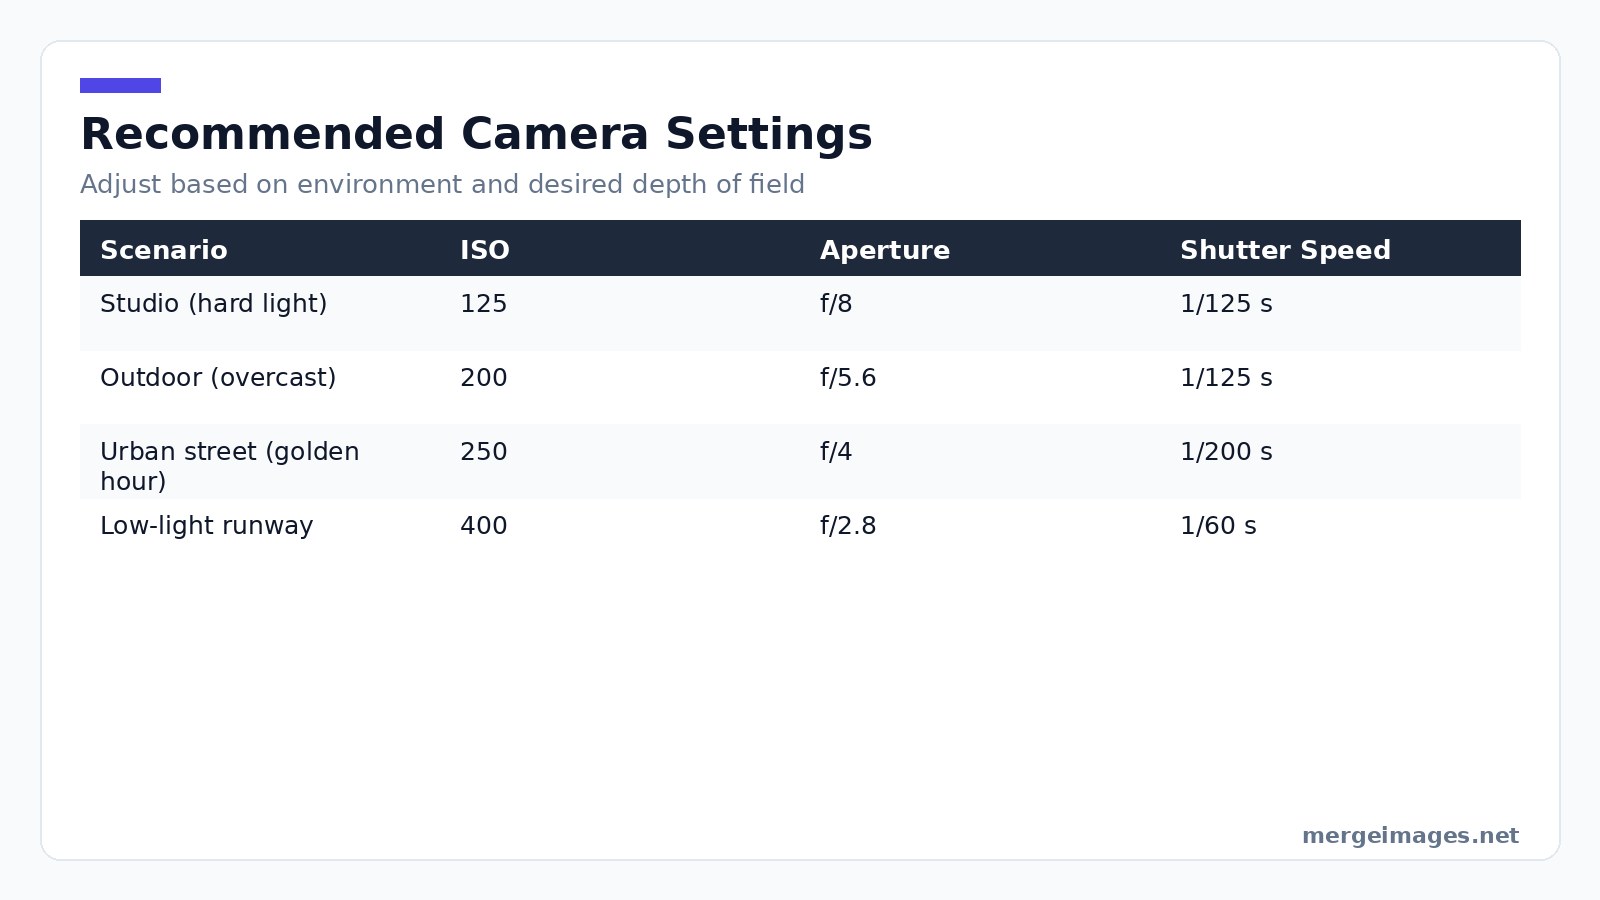
Relying on auto exposure is a frequent error. The camera may under expose the shadows that define the garment shape. Switch to manual mode. Use the histogram to verify that the highlight peak stays just below clipping. Add a slight diffuser to soften specular spikes without losing the sheen when shooting reflective materials like silk or sequins.
I resized a 3000x4000px studio portrait to 1500x2000px using the image resizer. The file shrank from 3.2MB to 850KB. The fine stitch of a denim seam stayed intact. That speed convinced me browser tools can replace bulky desktop software for lookbook workflows.
Shooting for Brand Consistency
Every brand has a visual DNA. Color palette. Texture emphasis. Mood. Review the designer lookbook before the shoot. Note recurring elements. Carry those cues into your lighting ratio and background choice. A concrete wall works for urban grit. A smooth white backdrop lets the garment speak for a high-fashion line.
Never let your personal aesthetic eclipse the client vision. Subtle personal touches add personality without breaking brand cohesion. A slight tilt of the head. A unique pose. Capture full body, medium, and tight shots in each outfit. The full view tells the story. The close up reveals stitching, embroidery, or hardware that persuades a buyer.
Watch a practical limitation: file system naming conventions. Inconsistent names lead to lost assets during hand off. Adopt a strict pattern such as SS22_Collection01_Outfit03_Front. Keep it across all tools.
Building Consistent Collages
The photo collage maker lets you assemble a lookbook without opening Photoshop. Upload the resized images. Select a layout that matches your narrative. Maybe a dominant full body image surrounded by detail thumbnails. Or a tight grid that showcases a capsule collection.
I used the background remover on a white wall shot. The model silhouette stayed crisp. The transparent PNG loaded in seconds. Dropping that PNG into the collage eliminated the distracting wall. The outfit floated on a muted pastel that matched the brand secondary color.
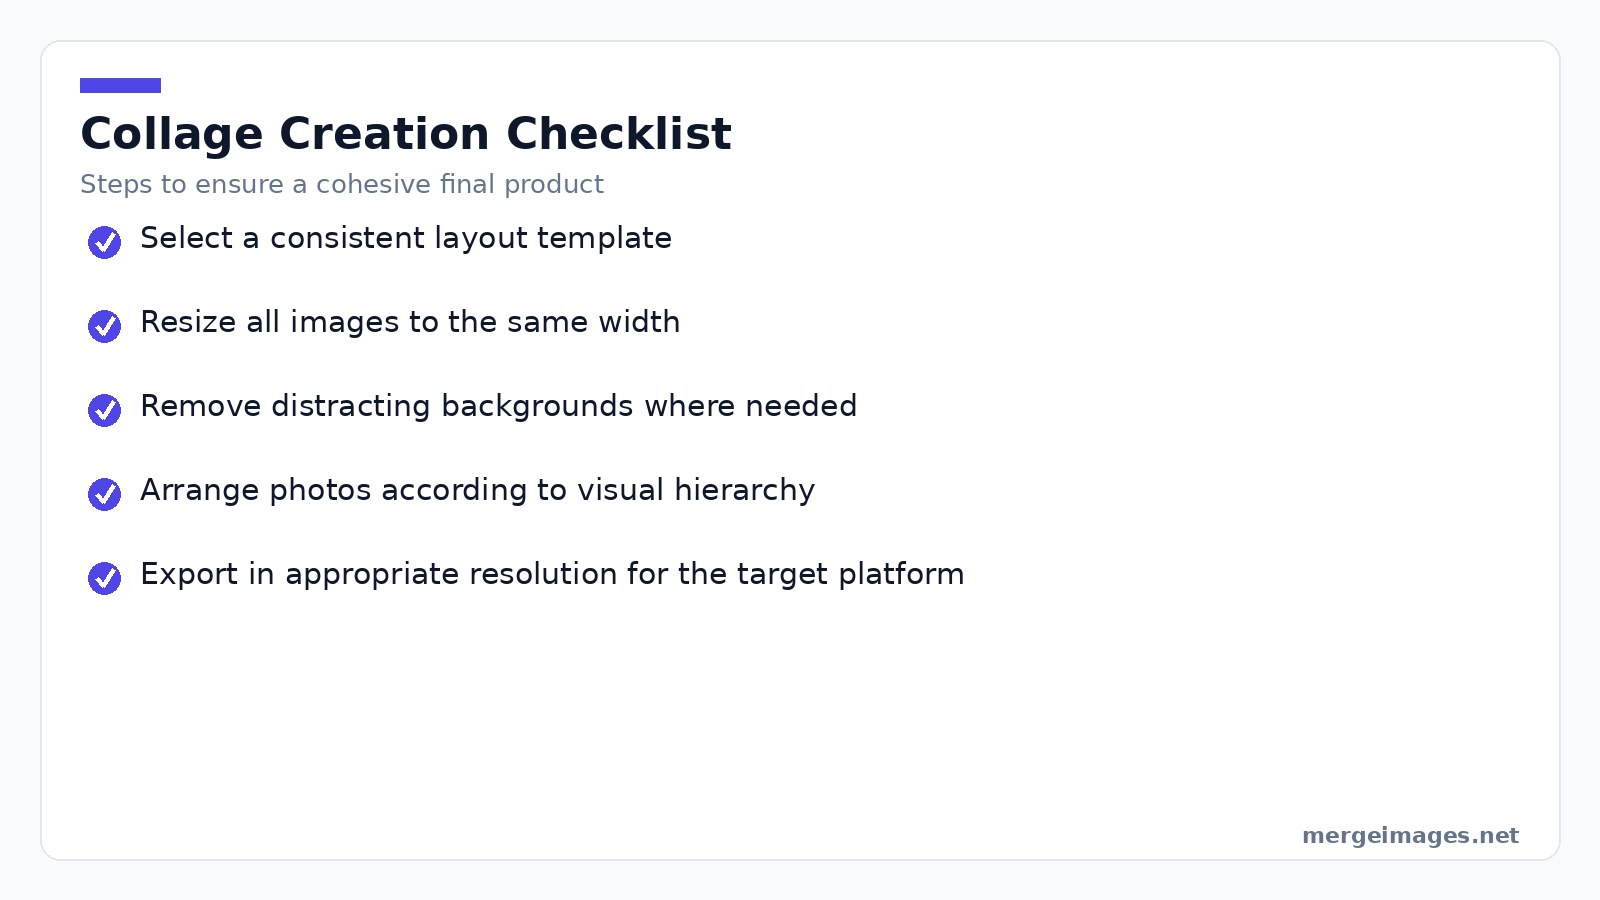
Maintain uniform image dimensions across the grid. Uneven heights create visual jitter that distracts the viewer. The image resizer guarantees each photo shares the same pixel width. The collage maker automatically aligns the edges. Add a simple text overlay for brand credits after arranging. This step requires a separate design app. Our tools focus on image merging only.
The collage maker limits maximum canvas size to 4000px on the longest side. Split the layout into two collages and re-assemble in a desktop layout program for large-format print spreads. The tool does not support CMYK output. Export as PNG and convert to CMYK later if the printer requires it.
Exporting for Digital and Print
Export a high-resolution PNG for print catalogs when the collage is complete. Export a compressed JPEG for web platforms. The image compressor reduces file size while preserving the subtle gradations of a silk blouse. A square 1080×1080px version works best for Instagram. A vertical 1000×1500px format catches the eye for Pinterest.
Embed color-corrected EXIF data if you plan to submit the files to a brand asset management system. Consistent naming conventions make retrieval painless later on. Season_Collection_OutfitNumber works.
A common mistake at this stage is forgetting to check the export DPI. Web images should be 72dpi. Print assets need 300dpi. Exporting a print-ready PNG at 72dpi results in a blurry catalog spread.
Frequently Asked Questions
How many photos should I include per outfit?
Three to five images cover most styling angles without overwhelming the viewer. Full body. Side view. Two close ups.
Can I use the collage maker for print-size PDFs?
The tool exports PNG and JPEG only. Open the exported file in a layout program and save as PDF for PDF output.
What file format works best for the background remover?
Upload JPEG or PNG files. The AI returns a transparent PNG that retains edge detail.
Is there a limit to how many images I can merge at once?
The collage maker supports up to 12 images per grid. Split larger projects into multiple collages.
Do I need to sign up to use the image resizer?
No. All tools are free. Browser based. No registration required.
Bonus Tips for Faster Turnaround
- Pre-plan lighting ratios and save them as presets on your light-meter app.
- Use a tethered shooting setup so images appear instantly in your browser for quick cropping.
- Batch-rename files with a simple script to enforce naming conventions without manual effort.
- Keep a library of reusable background-removal presets for common fabrics (denim, silk, leather) to speed up the masking step.
These extra practices can shave ten to fifteen minutes off each outfit’s workflow, helping you meet tight publishing deadlines while maintaining top-tier visual quality.
Practitioner Pitfalls and Limits
Even with a solid checklist, real-world shoots run into issues. Power fluctuations can cause the half-power setting to drift, resulting in inconsistent exposure across outfits. Carry spare batteries and a portable voltage regulator to keep the light output stable.
When shooting reflective fabrics, the hard edge can create hot spots that erase subtle sheen. A thin diffusion panel placed two feet from the subject will tame the spikes without sacrificing the defined shadow edge you need for texture.
The 4000px canvas ceiling of the collage maker means that high-resolution print spreads above A2 size must be tiled. Plan your layout in advance so that each tile contains a logical visual block; otherwise the final assembled PDF may look disjointed.
Finally, remember that browser-based tools run in the client’s memory. Very large image batches may cause the browser to stall or crash on older machines. In those cases, break the batch into smaller groups or fall back to a desktop image editor for the final assembly.

Bello builds useful software and writes thoughtful content to make sense of it all. He tests the tools himself and checks the facts before any of it goes in a guide.
Try Our Free Image Tools
Ready to Try It?
Put these tips into practice with our free online image merger. No signup required.
Enhance your photos, free


