
Summarise this article with:
The number one reason home prints look blurry is simple arithmetic: you don't have enough pixels. A 4x6 inch print at 300 DPI needs exactly 1,200 x 1,800 pixels. Most smartphone snapshots clear that bar, but old scans, web images, and screenshots often don't. Run through this checklist before you send anything to a lab.
Step 1 - Calculate the Pixels You Need
The rule is: print width in inches x 300 = pixel width required. Anything under that number will show visible softness on a standard photo print. For large-format prints (canvas, posters) hung on a wall and viewed from more than 2-3 feet away, 150 DPI is acceptable.
The table below was computed in Python using the standard formula, verified July 2026.
| Print Size | Pixels @ 300 DPI (sharp) | Megapixels | Pixels @ 150 DPI (minimum) |
|---|---|---|---|
| 4 x 6 in | 1,200 x 1,800 | 2.2 MP | 600 x 900 |
| 5 x 7 in | 1,500 x 2,100 | 3.1 MP | 750 x 1,050 |
| 8 x 10 in | 2,400 x 3,000 | 7.2 MP | 1,200 x 1,500 |
| 11 x 14 in | 3,300 x 4,200 | 13.9 MP | 1,650 x 2,100 |
| 16 x 20 in | 4,800 x 6,000 | 28.8 MP | 2,400 x 3,000 |
| A4 (210 x 297 mm) | 2,480 x 3,508 | 8.7 MP | 1,240 x 1,754 |
The A4 figure is a common trip point: 210mm / 25.4 x 300 = 2,480 px (not the rounded 2,500 that sometimes circulates).
![]()
If your image falls short, resize it to the target dimensions before uploading to your lab. Stretching a 600-pixel-wide image to 1,200 px in your editing app doesn't add real detail, but it does give the lab the correctly sized canvas and prevents automatic upscaling on their end (which is usually worse than doing it yourself).
Step 2 - Choose the Right Color Space
Send sRGB JPEG files to any consumer or online photo lab. This is not a simplification: WHCC, Bay Photo, Mpix, Shutterfly, Costco, Snapfish, and Fujifilm Frontier printers all use dye/laser processes that expect sRGB input. Mpix explicitly rejects CMYK and requires RGB. Shutterfly's upload guide says the same.
CMYK is the territory of offset printing (brochures, magazines, packaging). If you're sending files to a traditional offset press, your designer or printer will tell you. For everything else, sRGB is correct, and using CMYK can shift your colors in unpredictable ways.
One thing I verified directly when checking lab specs: even labs that accept Adobe RGB files will soft-proof against sRGB for their prints, so the safest universal choice is sRGB at 8-bit color depth.
Step 3 - Set JPEG Quality Correctly
Save at JPEG quality 90 to 95 (or "Maximum" in Photoshop). Below quality 80, block artifacts become visible in smooth color gradients like skies. Above 95 gives negligible quality gain while the file size jumps sharply. Most labs cap uploads at 20-25 MB, and a quality-90 JPEG of a 24-megapixel photo sits comfortably under 10 MB.
If you're uploading many files, compress them to lab-friendly sizes without dropping below the quality threshold. Batch compression to 90% quality keeps all 6 standard print sizes well within file upload limits.
Step 4 - Add Bleed for Full-Bleed Prints
If your design extends color or pattern to the edge of the paper, you need bleed. Without it, a 0.5-1.5 mm cutting variance leaves a thin white sliver at one edge.
The standard is 3 mm on every side (0.125 inches in the US; these are functionally identical at print tolerances). For a 4 x 6 inch print, that means building your canvas at 4.25 x 6.25 inches (1,275 x 1,875 px at 300 DPI). Your full-color artwork fills that larger canvas; the trim line sits 3 mm inside the bleed edge.
Keep all text, faces, and logos at least 3 mm inside the trim line, in what printers call the safe zone.
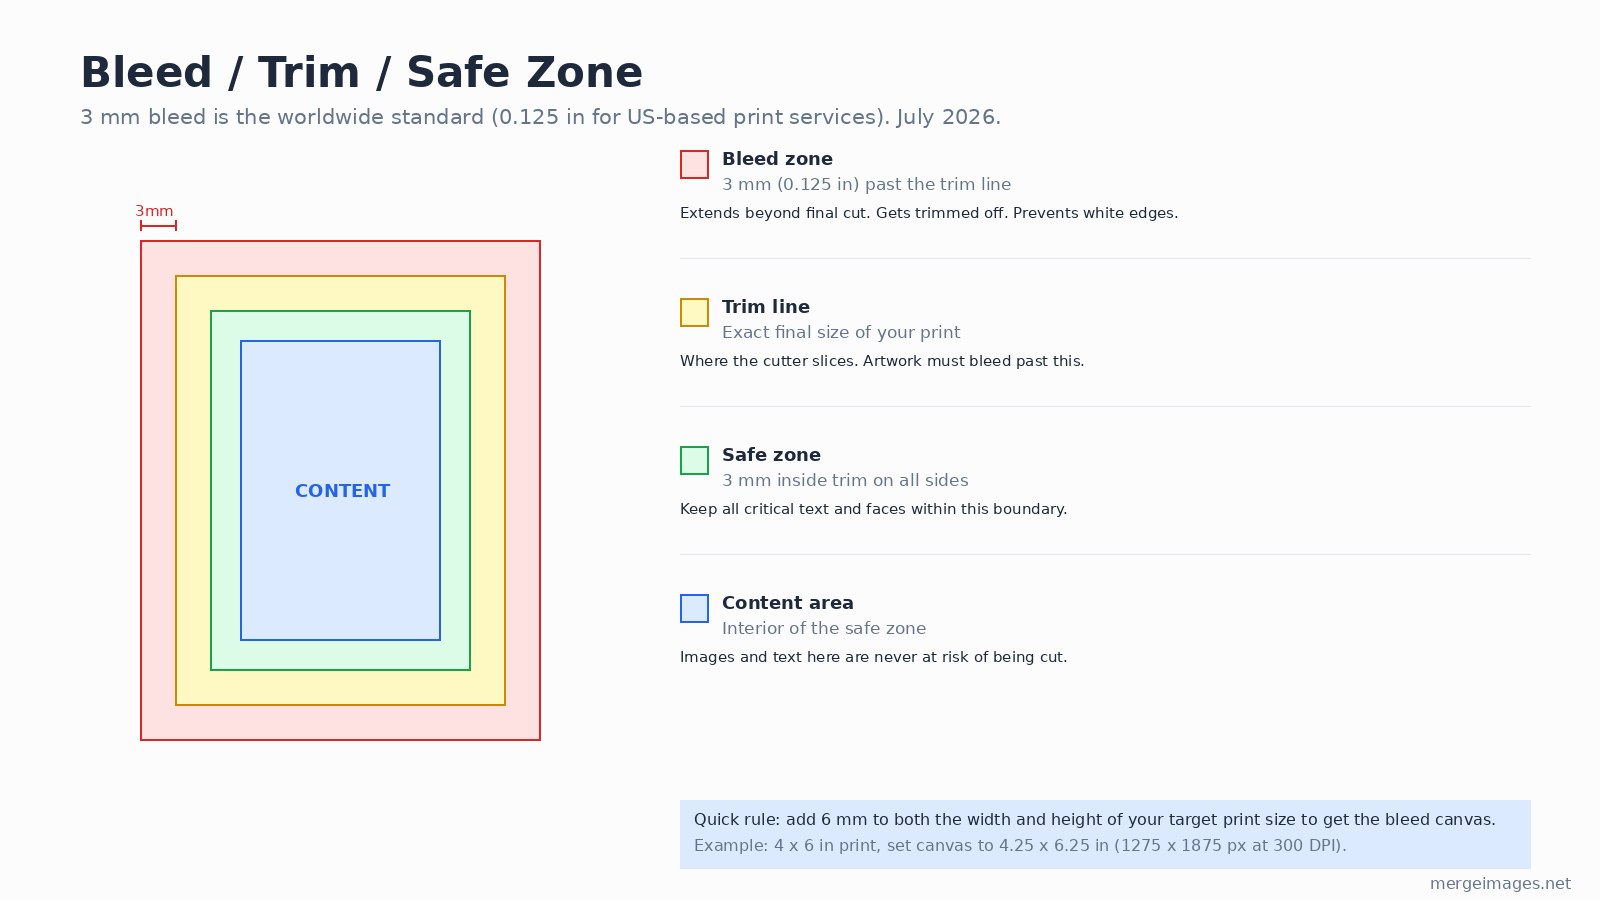
For simple borderless photo prints at Walgreens or CVS, bleed is usually handled automatically. You only need to set it manually when uploading layered artwork to a service like Printful, Moo, or Vistaprint.
Step 5 - File Format Reference
Different print workflows accept different formats. JPEG at maximum quality covers almost every consumer and professional photo lab. TIFF is lossless and the right choice for archiving original files or when handing off to a retoucher. PNG handles transparency for anything overlaid on a colored background (event programs, merchandise mockups). PDF is standard for print-at-home documents and anything containing text.
| Format | Best for | Notes |
|---|---|---|
| JPEG (q90-95) | Photo labs, online services | Universal; keep quality high |
| TIFF | Archiving, professional retouching | Lossless; larger files |
| PNG | Designs with transparency | No compression artifacts |
| Documents, multi-page layouts | Embed fonts; include bleed marks |
The Print-Prep Checklist
- Pixels wide enough: see the table in Step 1 for your specific print size
- Color space: sRGB for photo labs; CMYK only if your offset printer requests it
- JPEG quality: 90-95 (never below 80)
- Bleed: add 3 mm per side if the design runs to the edge
- Safe zone: keep faces and text 3 mm inside the trim line
- Sharpen slightly for print: digital images need a bit more sharpening than they look good at on screen; a gentle unsharp mask (radius 0.5-1 px, amount 80-120%) is enough
- Check orientation before uploading: a landscape photo ordered as a portrait print will either be cropped or rotated by the lab
For order-of-magnitude resolution checks on a new scan or download, the resize-images-without-losing-quality guide covers the interpolation tradeoffs in detail. And if you're preparing images for a print-on-demand product rather than a standard lab, the print-on-demand mockup guide lists the specific canvas sizes for Printful, Printify, and Redbubble.
Frequently Asked Questions
What DPI should I use for printing photos at home?
300 DPI at your target print size is the right target for inkjet photo printers (Canon PIXMA, Epson EcoTank, HP ENVY Photo). The printer itself may use 600 or 1200 dpi output dots, but the image file resolution should be 300 PPI when set to print dimensions. Check File > Print with Preview in Photoshop or the print dialog's "Image Size" display.
Can I print a 72 DPI image from the web?
Only if you scale it down. A 1,440 x 1,080 px web image at 72 PPI prints sharp at 4.8 x 3.6 inches at 300 DPI. The pixel count is what matters, not the embedded PPI metadata. Check your pixel dimensions, not the DPI number in the file header.
Do photo labs really reject CMYK files?
Many consumer labs (Mpix, Shutterfly) will silently convert CMYK to RGB, which often shifts warm tones. A few will reject the file outright. Either way, delivering sRGB avoids the problem entirely. Convert to CMYK only if your commercial offset printer specifically requests it and provides an ICC profile.
What is the minimum resolution for an 8 x 10 print?
The absolute minimum for a viewable result is around 1,200 x 1,500 px (150 DPI). You will see softness compared to a 300 DPI print (2,400 x 3,000 px). If your file is under 1,200 x 1,500 px, the lab will interpolate up and the result will look noticeably blurry.
Do I need bleed for standard photo prints at Walgreens or CVS?
No. Standard bordered prints (4x6, 5x7, 8x10) at chain photo labs crop the image to fit but don't require bleed documents. Bleed setup is only needed when you order borderless prints from a design-oriented service (Moo, Vistaprint, Printful) or when your artwork is a layout rather than a photo.
How do I check the pixel dimensions of my image before ordering?
On Windows, right-click the file and choose Properties > Details, then read "Image width" and "Image height." On a Mac, open in Preview and choose Tools > Show Inspector (Cmd+I). Divide each pixel count by 300 to get the maximum sharp print size in inches.
Bello builds useful software and writes thoughtful content to make sense of it all. He tests the tools himself and checks the facts before any of it goes in a guide.
Probieren Sie Unsere Kostenlosen Bildtools
Bereit es Auszuprobieren?
Setzen Sie diese Tipps mit unserem kostenlosen Online-Bildeditor in die Praxis um. Keine Anmeldung erforderlich.
Bilder Jetzt Zusammenfügen


