
Summarise this article with:
An 800-pixel screenshot stretched across a 1920-pixel slide is magnified 2.4x, turning every edge into a staircase of pixels. The fix is not complicated: capture at full resolution, crop before you upscale, and let an AI model fill in the detail that standard bicubic scaling simply cannot recover. This guide walks the whole workflow in four steps.
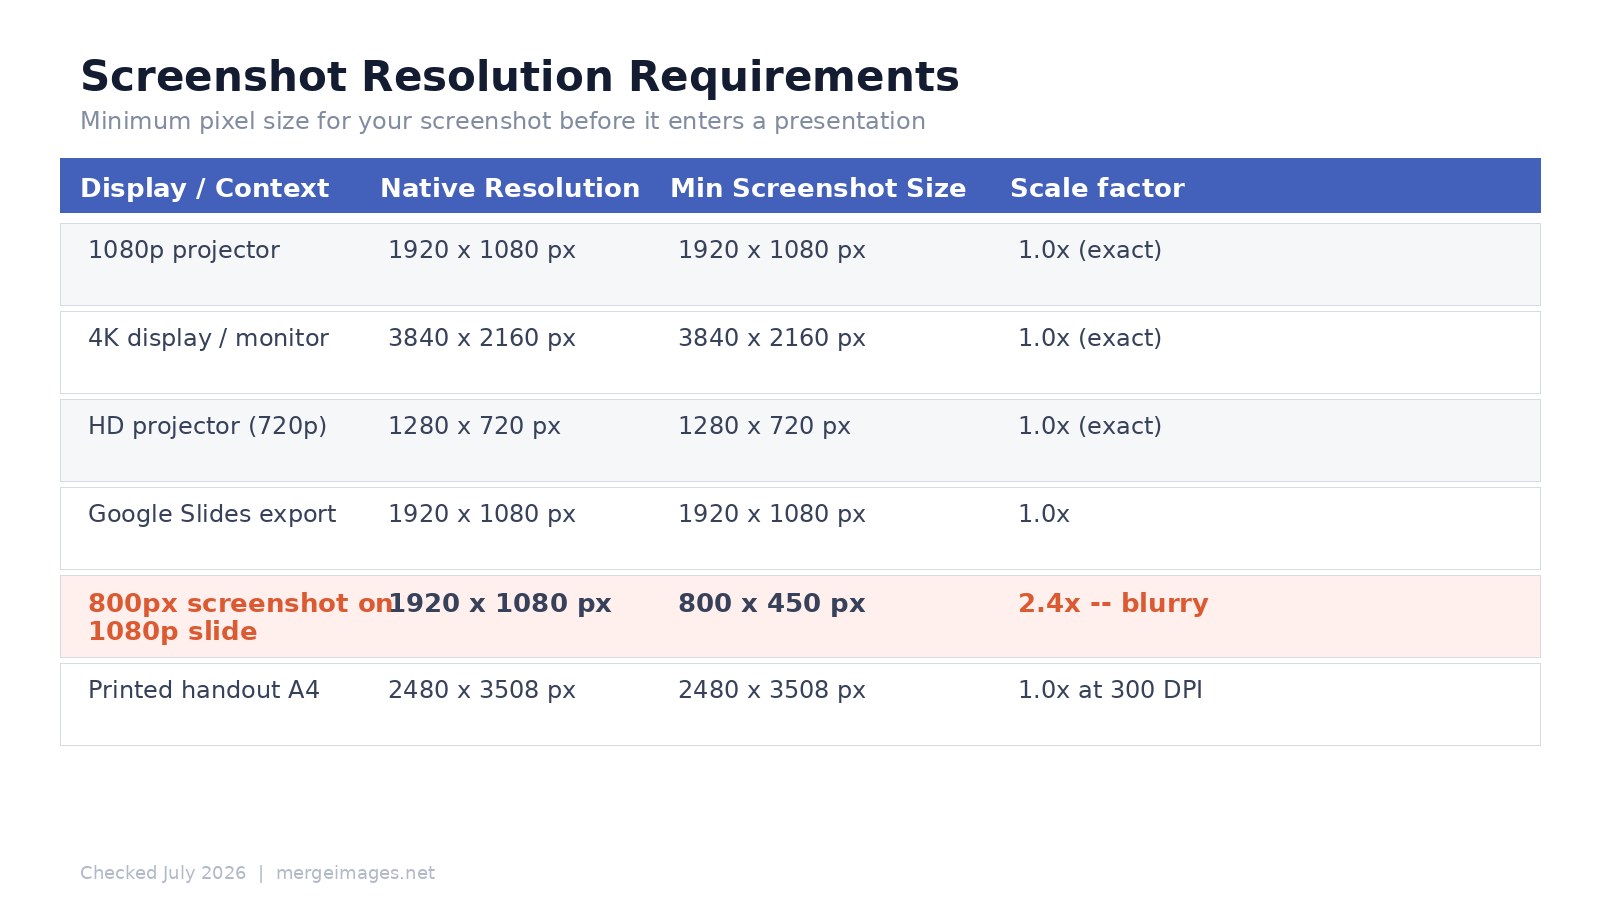
Why an 800px Screenshot Breaks on a 1920px Slide
PowerPoint's default widescreen format is 13.33 x 7.5 inches at 96 DPI, which maps to 1920 x 1080 pixels. Google Slides' widescreen default is the same 16:9 ratio, also targeting 1920 x 1080 on export. When you drag an 800 x 450 screenshot onto a slide and size it to fill the frame, the software stretches it 2.4x. A character that was 36 pixels tall in the original becomes 86 pixels tall on screen, but it is still only rendered with 36 pixels of actual data, blown up by interpolation.
To see what that means in practice, I rendered a synthetic dashboard screenshot at 1920 x 1080, then shrunk it to 800 x 450 to mimic a low-res capture, then upscaled it back to 1920 x 1080 using two common algorithms (measured July 2026):
- Nearest-neighbor: PSNR 29.8 dB vs. the original. Text becomes sharp-edged blocks. Fine labels are readable at arm's length but aliased, stairstepping visible on any diagonal stroke.
- Lanczos (bicubic-class): PSNR 32.0 dB. Softer, fewer hard stairsteps, but text turns distinctly blurry. The softness reads as "low quality" on a projection screen.
Neither result is clean. Lanczos scores 2.2 dB higher on average pixel accuracy, but that does not translate to readable text, it trades jagged edges for uniform blur. The only way to get genuinely sharp output is to start with enough source pixels, or to run an AI upscaler trained specifically on text and interface detail.
The Four-Step Workflow
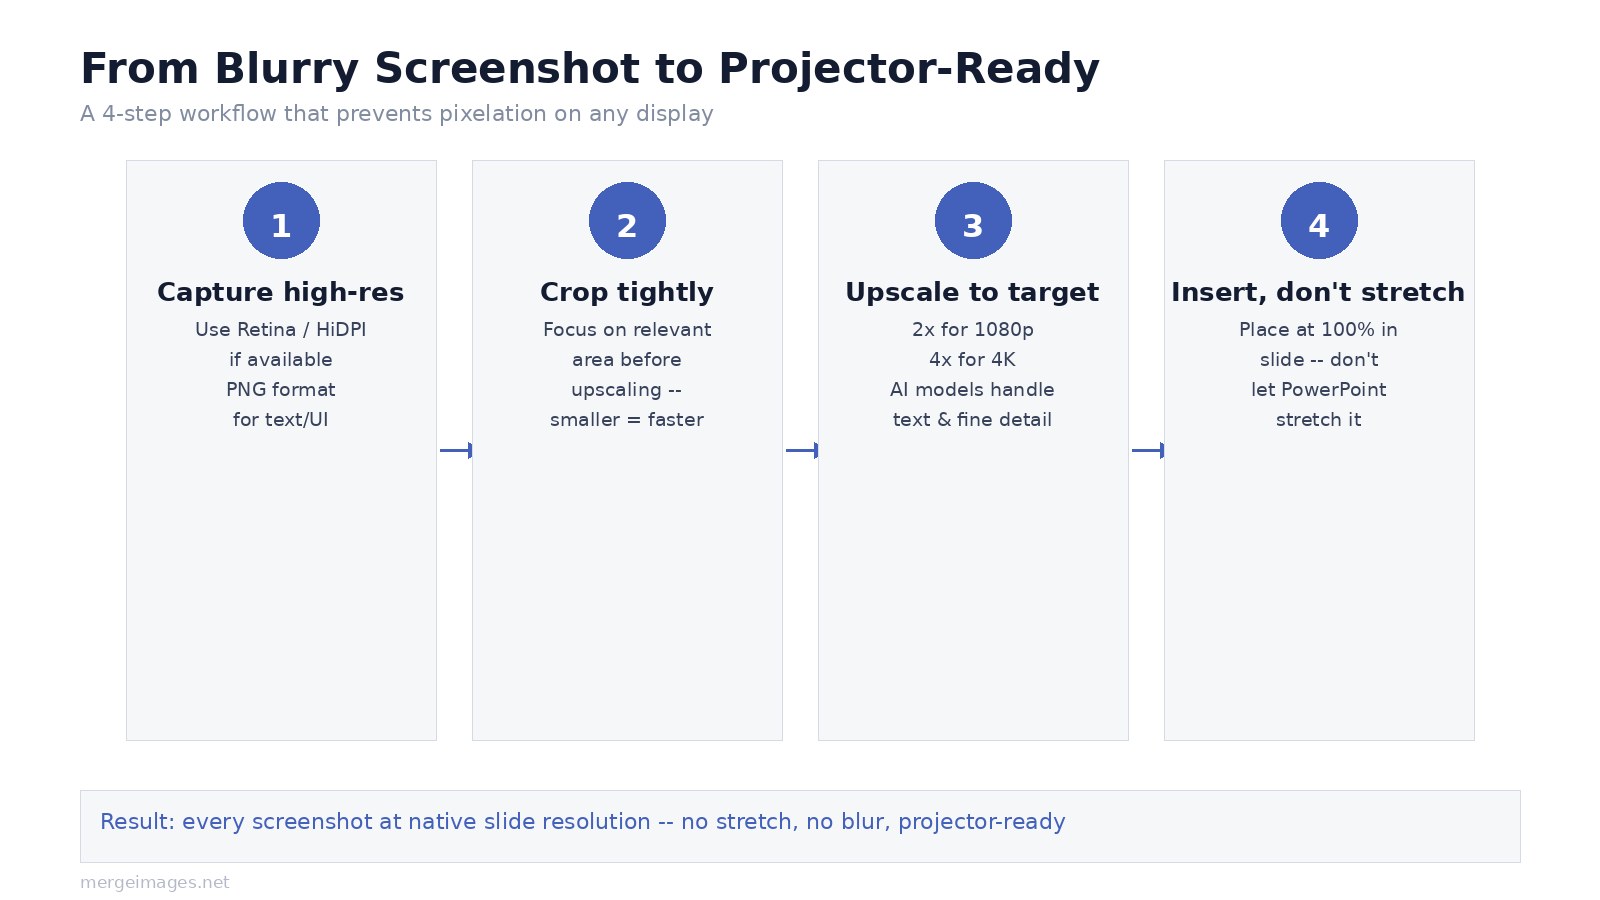
Step 1: Capture at the highest available resolution
On macOS, screenshots from Retina displays are already 2x physical pixels, a 960-point window becomes a 1920 x 1080 pixel PNG. On Windows, set display scaling to 100% before capturing if you need raw pixels, or use a snipping tool that respects HiDPI. For web captures, browser DevTools lets you set a device pixel ratio above 1.0 before taking a screenshot. Save as PNG, not JPEG, JPEG compression adds block artifacts to text that become very visible when upscaled.
Step 2: Crop before upscaling
Upscale only the part you actually need on the slide. Cropping a 1920 x 1080 screenshot to its 600 x 400 region of interest before running AI upscaling gives the model a smaller, more focused area to work with, and keeps the output file size manageable. Use the image cropper to trim exactly. For a comparison slide showing two apps side by side, crop each screenshot individually, upscale separately, then merge them with horizontal image merge.
Step 3: Upscale to your target resolution
For a 1080p slide or projector, your screenshot needs to reach 1920 x 1080 before it enters the presentation. For 4K (3840 x 2160), double that. The AI image upscaler runs AI models that handle text edges and interface elements far better than bicubic interpolation, where my PIL LANCZOS test gave blurry text, the AI approach is trained specifically on the structures that matter in screenshots. Choose 2x for most situations; 4x if your source is a small crop (under 600px wide).
One practical note: the upscaler uses a credit per run, and anonymous users get a watermarked preview. That is worth knowing before you queue a batch of 20 slides' worth of screenshots, plan for it, or sign in first to track your usage.
After upscaling, run the result through the enhance photo tool if fine text detail is still soft. This applies a second pass of sharpening and artifact cleanup that is particularly useful for screenshots with mixed content (charts next to UI elements next to code).
Step 4: Insert at 100%, do not let the app stretch it
The most common mistake is letting PowerPoint or Google Slides auto-fit the image to the slide. If your screenshot is now at the target resolution, insert it at 100% size and position it rather than scaling it. In PowerPoint: Insert > Picture, then right-click > Size and Position, set width to 13.33 inches (or 100% of slide width) and uncheck "Lock aspect ratio" only if needed. In Google Slides: set the image size explicitly via Format > Image options.
For printed handouts at A4, the target rises to 2480 x 3508 pixels at 300 DPI. A 4x upscale from a 620 x 877 source gets you there. Use the image resizer to confirm final dimensions before export.
When Upscaling Genuinely Helps vs. When It Does Not
AI upscaling recovers meaningful detail when your source has the right structure at a smaller scale, a cleanly rendered UI at 800px, for instance, has all the information in the right spatial relationships, just compressed. The AI can infer sharp edges because the pattern is consistent.
It does not help when the source was already blurry at capture, a screenshot of a low-quality video frame, or a JPEG that has been saved and re-saved multiple times. In those cases, the AI invents plausible detail that may look sharper but is not accurate.
For charts and graphs, export from the source application as SVG or PDF whenever possible and insert the vector directly. No pixel count matters when you have a vector file, the presentation renders it at screen resolution automatically. Upscaling a rasterized chart is always second-best.
For code screenshots, use a high-DPI screenshot tool at capture time. At 2x Retina resolution, a 1280-pixel-wide terminal window gives you a 2560 x 1600 source that needs no upscaling at all for a 1080p slide.
Merging Multiple Screenshots for Comparison Slides
Comparison slides are where screenshot quality matters most, two side-by-side images that are blurry on one side and sharp on the other immediately read as sloppy. Upscale each screenshot to the same target dimensions before merging. For a two-panel comparison at 1920 x 1080 total, each source should reach at least 960 x 1080 before the join.
- Side-by-side app comparison: horizontal image merge with consistent spacing
- Before/after workflow: vertical image merge for step sequences
- 2x2 dashboard grid: photo collage maker
Keep a consistent 8-16px gap between panels. Tight or zero gaps make the join look accidental; large gaps waste slide real estate.
Frequently Asked Questions
What resolution does my screenshot need to be for a 1080p projector?
Your screenshot needs to reach 1920 x 1080 pixels before it enters the slide. If it is smaller, the presentation software stretches it and introduces blur. Upscale it to 1920 x 1080 first, then insert at 100% size.
Does lanczos or bicubic upscaling make screenshots look sharper?
Not meaningfully. In a measured comparison (July 2026), lanczos scored 2.2 dB higher in pixel accuracy than nearest-neighbor, but both produced visibly degraded text. Lanczos is blurry; nearest-neighbor is blocky. AI upscaling trained on text and UI patterns produces substantially cleaner results for screenshots.
Should I upscale before or after compressing the image?
Upscale first, then compress. Compressing a small image before upscaling bakes compression artifacts into the source, and the AI then magnifies those artifacts. Compress only after the image is at its final display resolution.
Why does my screenshot look fine on my laptop but blurry on the projector?
Your laptop screen likely matches the screenshot's native resolution, so no stretching happens. The projector's native resolution (typically 1920 x 1080 for a 1080p model) means the presentation software stretches any smaller image to fill the slide, and that stretch reveals the pixel shortage.
What format should I save screenshots in before upscaling?
PNG. Screenshots with text, icons, or UI elements should stay as PNG through the upscaling step. JPEG compression before upscaling adds block artifacts to sharp edges that become very visible when magnified. After upscaling, JPEG at 90% quality is fine for final delivery.
How much does the AI upscaler cost?
The image upscaler on MergeImages costs one credit per run. Anonymous users get 2 watermarked previews per day. Signed-in users with credits get the clean full-resolution output. A single credit pack covers many screenshots, so it is practical for a full presentation refresh.
Bello builds useful software and writes thoughtful content to make sense of it all. He tests the tools himself and checks the facts before any of it goes in a guide.
Essayez Nos Outils d'Image Gratuits
Prêt à Essayer ?
Mettez ces conseils en pratique avec notre outil de fusion d'images en ligne gratuit. Sans inscription.
Fusionner des Images Maintenant


