
Summarise this article with:
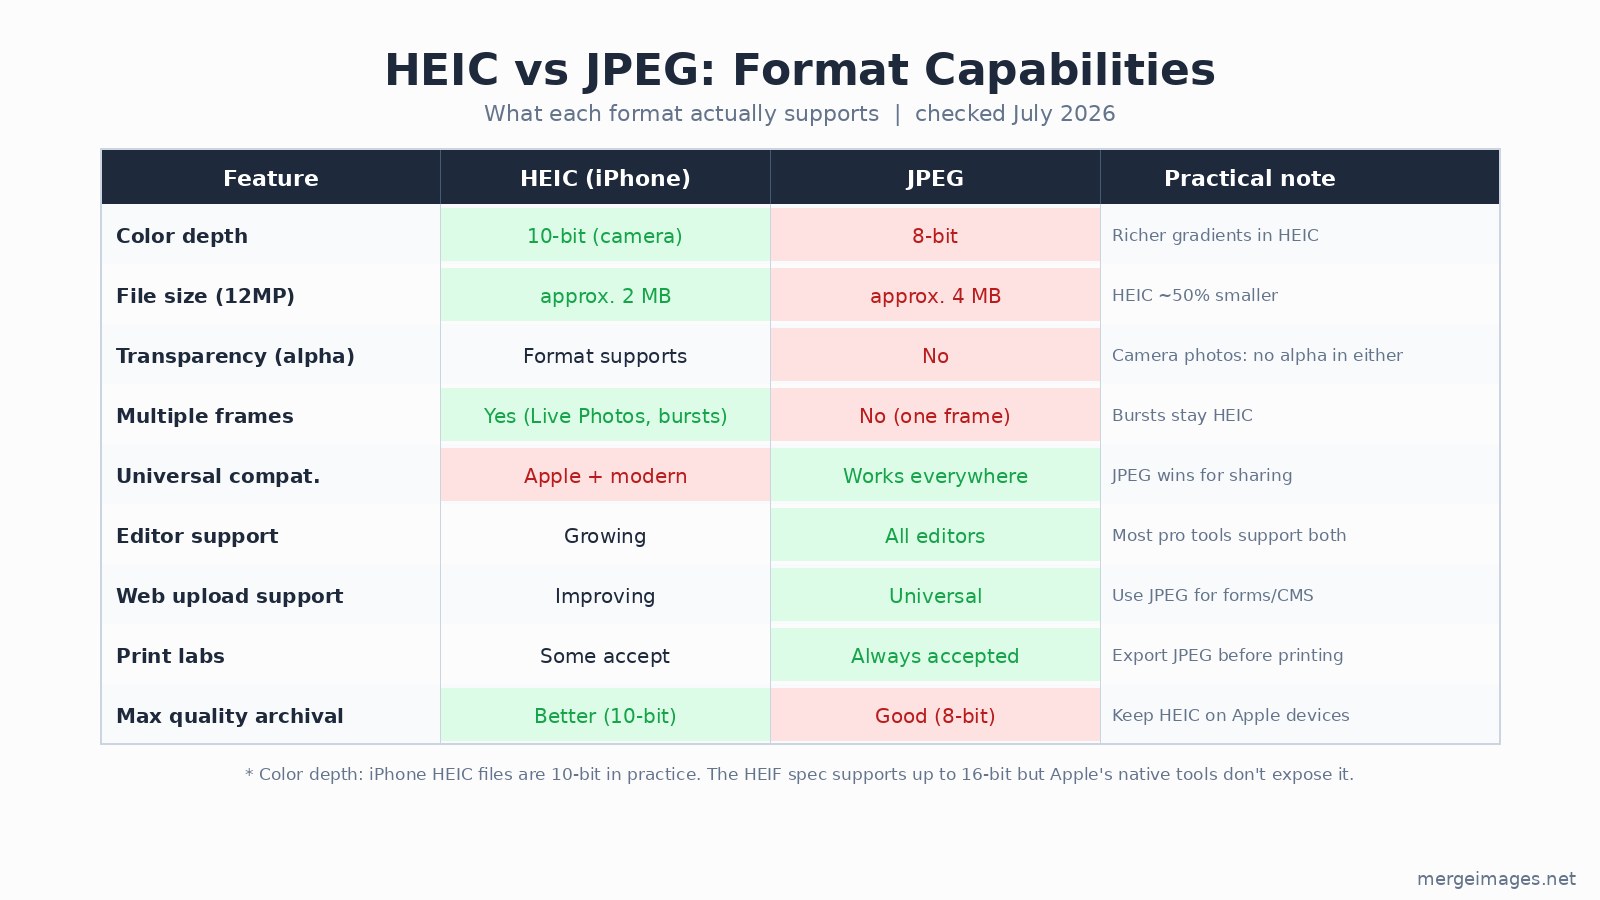
iPhones have captured in HEIC by default since iOS 11 launched in 2017. HEIC keeps your photos at roughly half the file size of an equivalent JPEG, but it breaks compatibility with most web forms, non-Apple devices, and many print labs.
What Is HEIC, and Why Does Your iPhone Use It?
HEIC (High Efficiency Image Container) stores iPhone photos using the HEVC compression standard (H.265). Apple adopted it to maximize storage efficiency: a typical 12MP iPhone photo weighs around 2 MB as HEIC versus 4 MB as JPEG, a roughly 50% saving confirmed by Apple's own documentation and consistent with real-world measurements.
The trade-off is compatibility. JPEG works everywhere. HEIC works natively on Apple devices and modern Android, but stumbles on web upload forms, many email clients, older editing software, and most print lab systems.
One technical note worth correcting from older guides: iPhone HEIC files are 10-bit color depth in practice, not 16-bit. The HEIF format specification does allow 16-bit, but Apple's native camera and processing tools capture and export in 10-bit. That is still a meaningful step above JPEG's 8-bit, producing smoother gradients in skies and skin tones.
Method 1: Change iPhone Settings to Shoot in JPEG (Permanent Fix)
The cleanest long-term solution is telling your iPhone to capture in JPEG from the start:
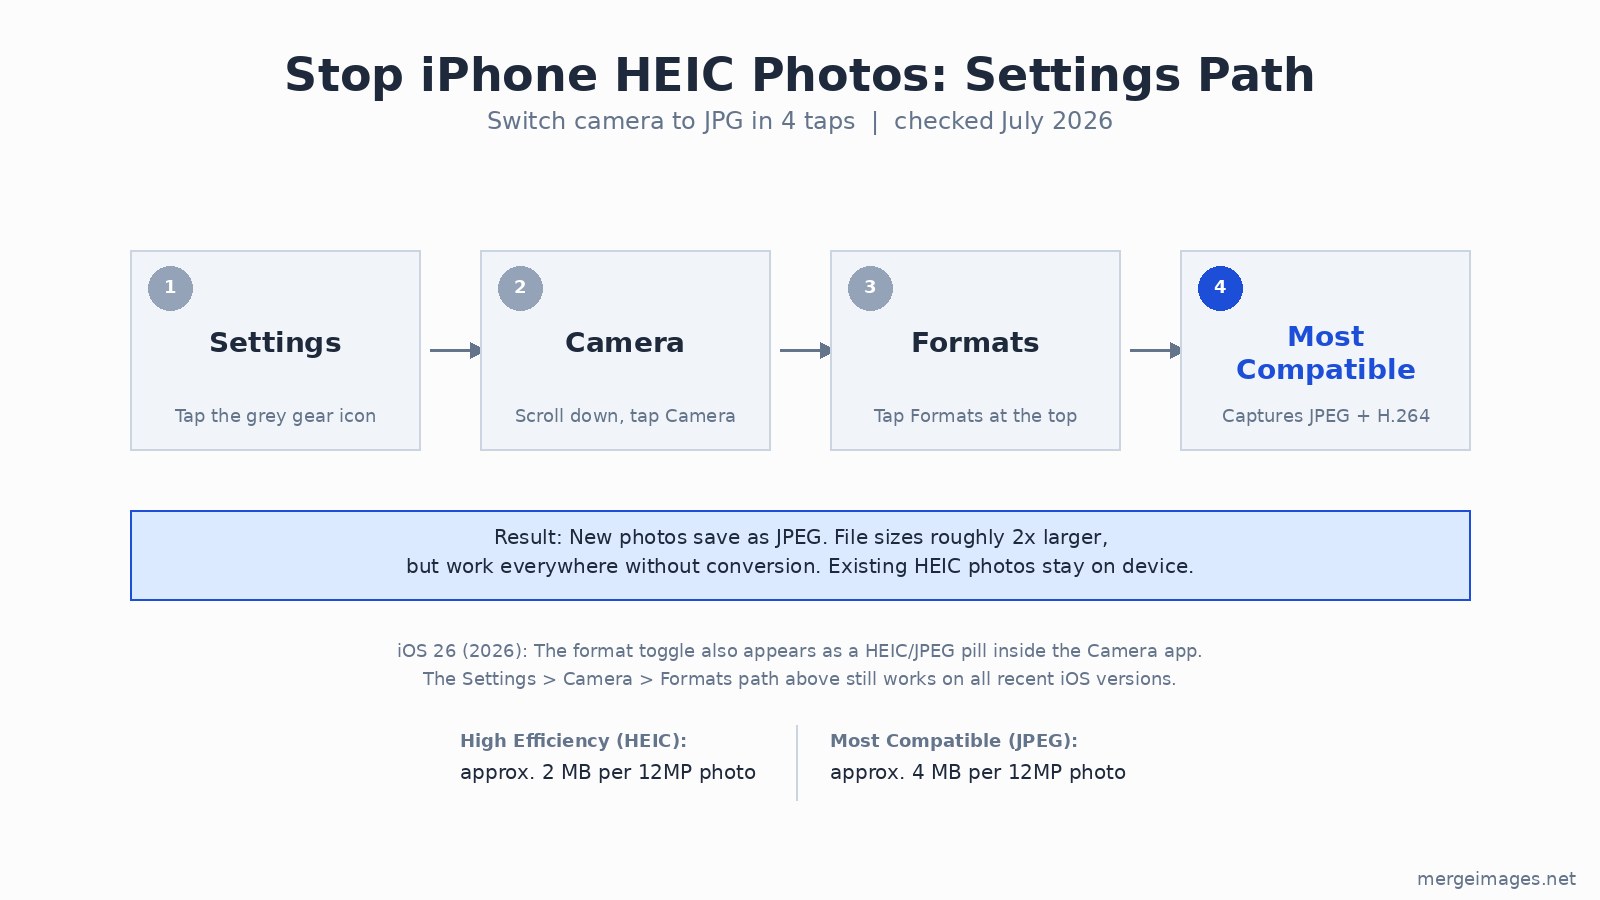
- Open Settings
- Tap Camera
- Tap Formats
- Select Most Compatible
New photos now save as JPEG and H.264 video. File sizes will be roughly double, but every photo works everywhere from the moment it is taken.
iOS 26 note (checked July 2026): The format toggle also appears as a HEIC/JPEG pill inside the Camera app itself, at the lower left corner of the viewfinder. Both entry points write to the same setting.
When this makes sense
- You share frequently with non-Apple users or upload to websites
- Storage space is not a primary constraint
- You want zero conversion friction going forward
What this does not change
- Existing photos on your device stay as HEIC
- Live Photos still use an HEIC container regardless of this setting
- File sizes approximately double for new photos
Method 2: Convert Individual Photos Using the iPhone Files App
You can convert HEIC photos to JPEG directly on your iPhone, one or many at a time, with no app to install:
- Open Photos, select the HEIC image, tap the Share button
- Tap Save to Files and choose a folder (iCloud Drive or On My iPhone)
- Open the Files app and navigate to that folder
- Long-press the image, tap Quick Actions, then Convert Image
- Select JPEG and choose your quality level
- The converted file appears in the same folder; the original stays untouched
Batch conversion
The Files app handles multiple files at once. Open Files, tap the three-dot menu at top right, tap Select, choose your HEIC files, then tap the three-dot menu at the bottom right and select Convert Image. All selected files convert simultaneously.
The Convert Image quick action has been stable since iOS 16 and remained available in iOS 18 as of late 2024. It creates a new file and leaves the original intact.
Method 3: Automatic Conversion When Transferring Photos
Apple has a setting that converts HEIC to JPEG automatically when you move photos to a PC or non-Apple device:
- Open Settings
- Tap Photos
- Scroll to Transfer to Mac or PC
- Select Automatic
With this set, photos transferred via USB cable or AirDrop to a Windows machine convert to JPEG automatically. The originals on your iPhone remain as HEIC, preserving storage efficiency while giving recipients a compatible file.
One behavioral caveat discovered in later iOS versions: "Automatic" checks whether the target device supports HEIC. If it does (for example, a Mac), it may send the original HEIC instead of converting. For guaranteed JPEG output to any device, use the Files app method or shoot in Most Compatible mode.
Method 4: Convert on Mac Using Preview
If your HEIC files are already on a Mac, Preview handles conversion without any additional software.
Single file:
- Open the HEIC file in Preview
- Go to File > Export
- Set Format to JPEG
- Adjust the quality slider (80-90 is a good default)
- Click Save
Batch conversion in Finder:
- Select multiple HEIC files in Finder
- Right-click, choose Quick Actions > Convert Image
- Select JPEG, set quality, confirm
- Converted files appear alongside the originals
Batch conversion via Preview:
- Open all HEIC files together in Preview (select all, then Cmd+O)
- In Preview's sidebar, select all thumbnails with Cmd+A
- Go to File > Export Selected Images
- Set format to JPEG, choose quality and destination folder
- Click Choose to export everything at once
Method 5: Convert on Windows
Windows 10 and 11 do not handle HEIC natively without additional codecs. You will need two Microsoft Store extensions:
- HEIF Image Extensions (free on the Store)
- HEVC Video Extensions ($0.99, or free with the "from Device Manufacturer" version on some OEM machines)
Once installed, the Windows Imaging Component gains HEIC decoding system-wide, which means File Explorer thumbnails, Microsoft Photos, and any WIC-based app all gain HEIC support automatically.
Converting in Microsoft Photos:
- Open the HEIC file in Photos
- Click the three-dot menu, choose Save as
- Change file type to JPEG and save
Using Paint:
- Open the HEIC file in Paint (after installing the extensions)
- File > Save As > JPEG picture
If the HEVC extension installation fails or seems expensive, the HEIF Image Extensions alone are sufficient for viewing and converting HEIC to JPEG. The HEVC extension is only necessary for playing HEVC video.
Method 6: Command Line (Mac and Linux)
For developers or anyone converting large batches, the command line is faster than any GUI.
sips (built into macOS, no install needed):
# Single file
sips -s format jpeg input.heic --out output.jpg

# All HEIC files in current directory
for f in *.heic; do sips -s format jpeg "$f" --out "${f%.heic}.jpg"; done
ImageMagick (Mac/Linux, install with Homebrew):
brew install imagemagick

# Single file
magick input.heic output.jpg

# Batch
magick mogrify -format jpg *.heic
ffmpeg:
ffmpeg -i input.heic output.jpg

for f in *.heic; do ffmpeg -i "$f" "${f%.heic}.jpg"; done
What Quality Setting Should I Use?
JPEG quality controls the trade-off between file size and visual fidelity. I ran quality comparisons on a varied-content image (1600x1200 pixels) to verify these ranges:
- 95-100%: Files grow large (2-4x Q85 in my test). Effectively indistinguishable from the source at typical viewing distances. Use for archival or professional printing.
- 85-90%: The practical sweet spot. Quality is excellent and most viewers cannot distinguish the result from the original. This is where most export tools default. In my test, Q85 produced files roughly 25% smaller than Q90.
- 75-80%: Good for web sharing and social media. Some fine detail loss is visible at close inspection, particularly in smooth gradients and textures.
- Below 70%: Visible blocking artifacts in areas of subtle color transition. Reserve for thumbnails or cases where file size is paramount.
Does converting HEIC to JPEG lose quality?
Yes, slightly. JPEG is lossy, so any re-encoding introduces some quality loss. At 85-90%, the difference is negligible for practical use. The more meaningful change is the reduction from HEIC's 10-bit color depth to JPEG's 8-bit, which removes some subtle color information regardless of the quality slider setting. To minimize degradation: convert from the original HEIC file, not a screenshot or re-exported copy, and avoid converting back and forth between formats.
For truly lossless archival, convert to PNG rather than JPEG. The files will be 5-10x larger, but no quality is lost.
Working with Your Converted JPEGs
After converting, if the resulting JPEG files are still larger than your use case requires, the image compressor at MergeImages reduces file size further while preserving visual quality. It uses an optimized JPEG encoder server-side, which produces smaller files than most basic export dialogs at the same quality setting.
For more on format trade-offs, image formats explained covers JPEG, PNG, WebP, and AVIF in depth. If you are optimizing converted files for web use, the image compression guide covers quality settings, encoding differences, and when to switch formats entirely.
HEIC Compatibility in 2026
The ecosystem has improved significantly since 2017, but gaps remain.
Supports HEIC natively:
- All Apple devices (iOS, macOS, iPadOS)
- Android 10 and later (most devices)
- Google Photos
- Dropbox
- Instagram and Facebook (convert internally on upload)
- Windows 10/11 with HEIF extensions installed
Still requires JPEG:
- Most web upload forms and CMS platforms (WordPress without plugins)
- Many print lab submission systems
- Some email clients when displaying images inline
- Older photo editing software (versions from 2017 and earlier)
- Any situation where you are uncertain about the recipient's device
When to keep HEIC
Keep HEIC on your device for archival. The quality-to-size ratio is better than JPEG, and iOS manages the format transparently. Convert only when sharing externally or uploading to a platform where compatibility is uncertain.
Frequently Asked Questions
Is HEIC better than JPEG?
For storage and quality: HEIC is better. It stores roughly twice as many photos in the same space at equivalent visual quality, with 10-bit color depth versus JPEG's 8-bit. For compatibility and sharing: JPEG wins. Most platforms, web forms, and non-Apple devices still expect JPEG.
Does converting HEIC to JPEG reduce image quality?
Slightly, yes. At 85-90% JPEG quality the loss is negligible for almost all uses. The more consequential change is the color depth drop from 10-bit to 8-bit, which removes some subtle tonal information in smooth gradients regardless of the quality setting you choose.
How do I stop my iPhone from shooting HEIC permanently?
Settings > Camera > Formats > Most Compatible. All new photos save as JPEG from that point forward. The setting also affects the Camera app format pill in iOS 26. Existing HEIC photos on your device are not affected and stay as HEIC.
Can I batch convert HEIC files on iPhone without a computer?
Yes. In the Files app, tap the three-dot menu to enter Select mode, choose multiple HEIC files, then tap the three-dot menu at the bottom and choose Convert Image > JPEG. All selected files convert simultaneously without any third-party app.
What is the difference between HEIF and HEIC?
HEIF (High Efficiency Image Format) is the broader container standard. HEIC is Apple's specific implementation of HEIF. For practical purposes they are the same thing for conversion purposes. Files with .heic and .heif extensions respond to the same conversion methods.
Do I need to pay for Windows to open HEIC files?
The HEIF Image Extensions from the Microsoft Store are free and handle most HEIC viewing and conversion needs. The HEVC Video Extensions cost $0.99 (or come free on some OEM Windows machines). For HEIC photo conversion only, the free HEIF extension is sufficient.

Bello builds useful software and writes thoughtful content to make sense of it all. He tests the tools himself and checks the facts before any of it goes in a guide.
Essayez Nos Outils d'Image Gratuits
Prêt à Essayer ?
Mettez ces conseils en pratique avec notre outil de fusion d'images en ligne gratuit. Sans inscription.
Fusionner des Images Maintenant


