
Summarise this article with:
A perfectly lit plate can boost clicks by 30% and make a home-cooked bowl look restaurant-ready. Good lighting, thoughtful styling, and quick post-processing are the three pillars of food photography. With a window, a few props, and three free browser tools you can shoot professional-grade images on any phone.
Lighting Sets the Rules
Light dictates everything else. Surface choice, props, camera angle, styling. All of it happens inside the light you build. You cannot rescue bad light with a fancy prop. You can make a plain bowl of fruit look like a magazine cover with good light.
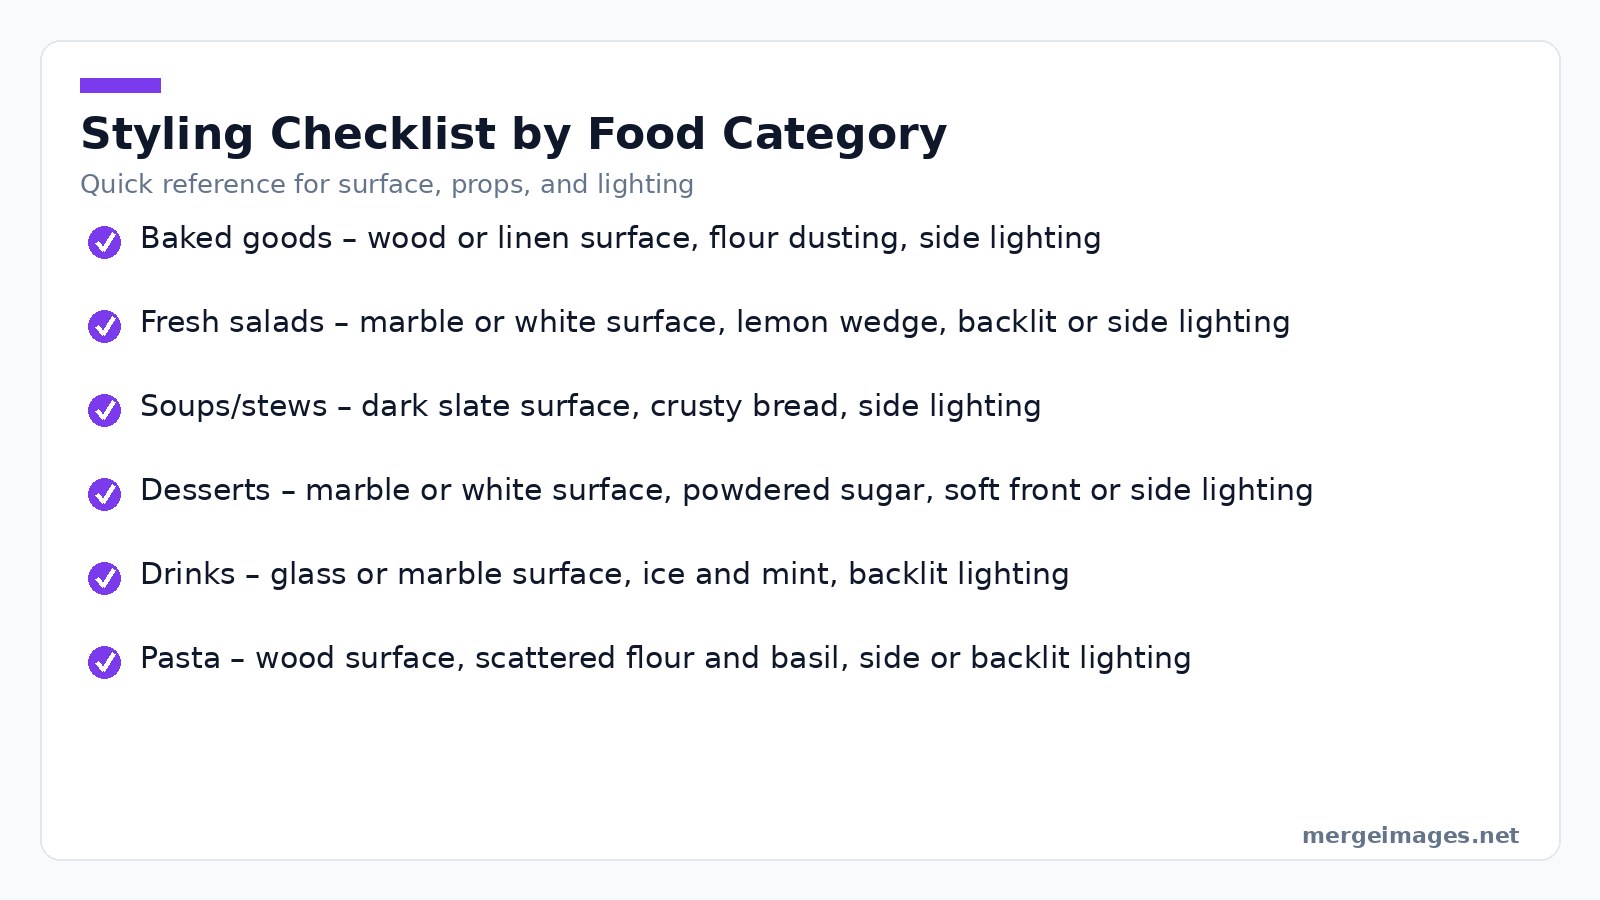
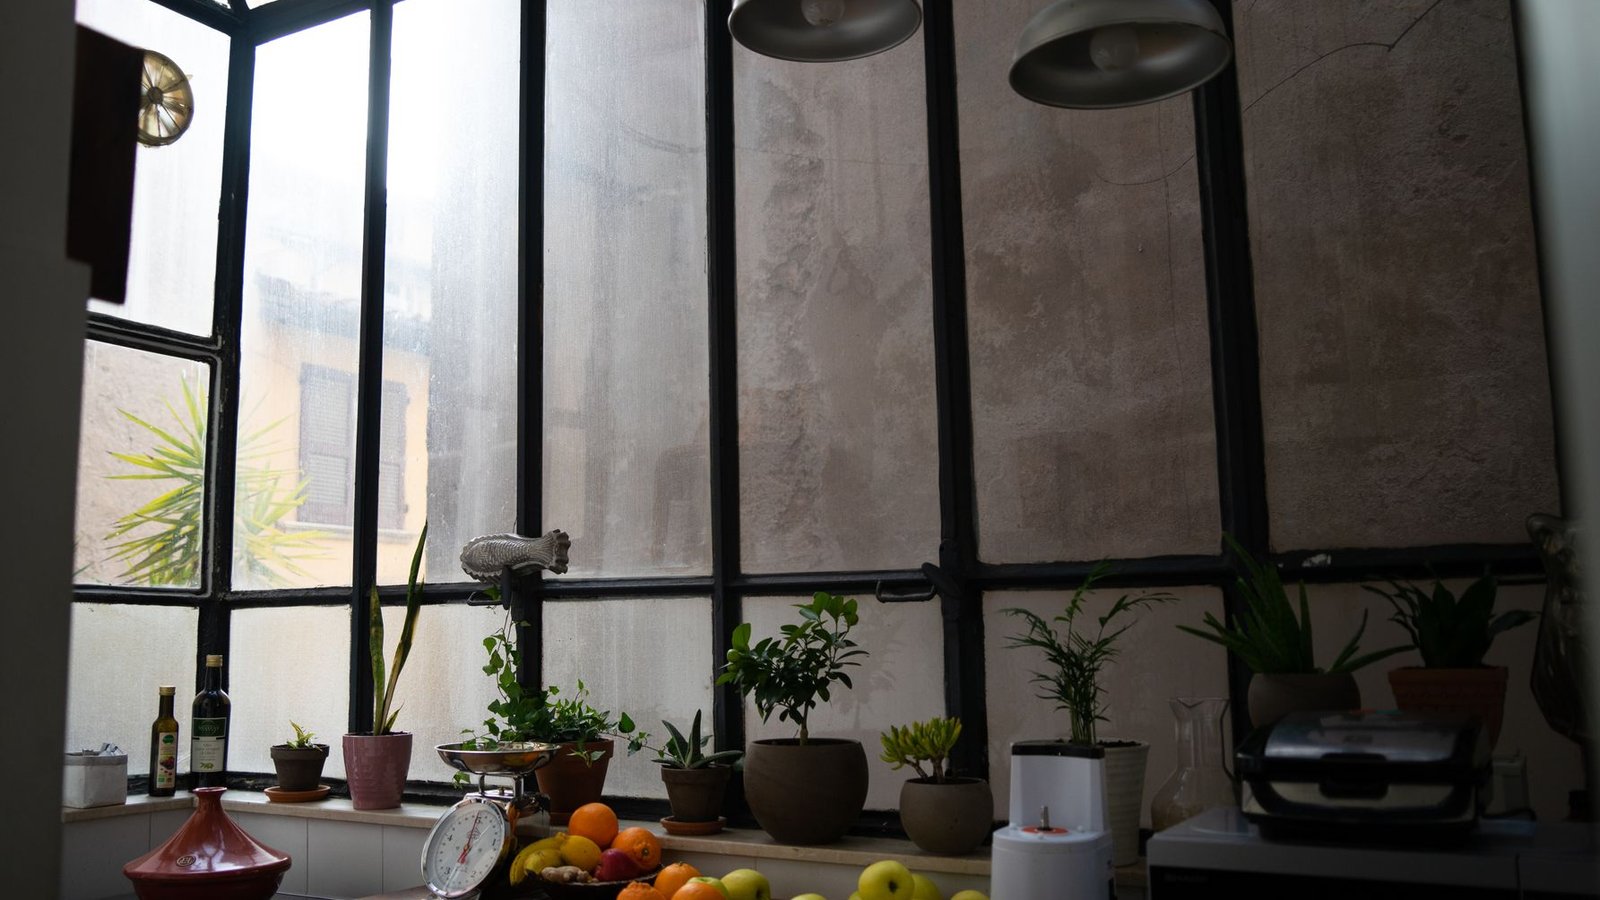
Photo: Catalin Buescu via Pexels
Diffusion is the core principle. Direct light throws harsh shadows that flatten food and kill appetite appeal. Diffused light wraps around three-dimensional subjects. It reveals texture and depth without carving out distracting dark pockets. When a shot still reads flat, the photo enhancer gives a one-click contrast and color lift before you post.
Two Sources That Actually Work
Large window on an overcast day. Clouds act as a massive softbox. The light stays even, shadow-free, and flattering to almost any subject. You need zero equipment for professional results.
LED flat panel with diffusion. Put a rectangular LED panel behind a thin white curtain to fake window light. A 30x30 cm panel handles close-ups. A 60x60 cm panel covers larger spreads.
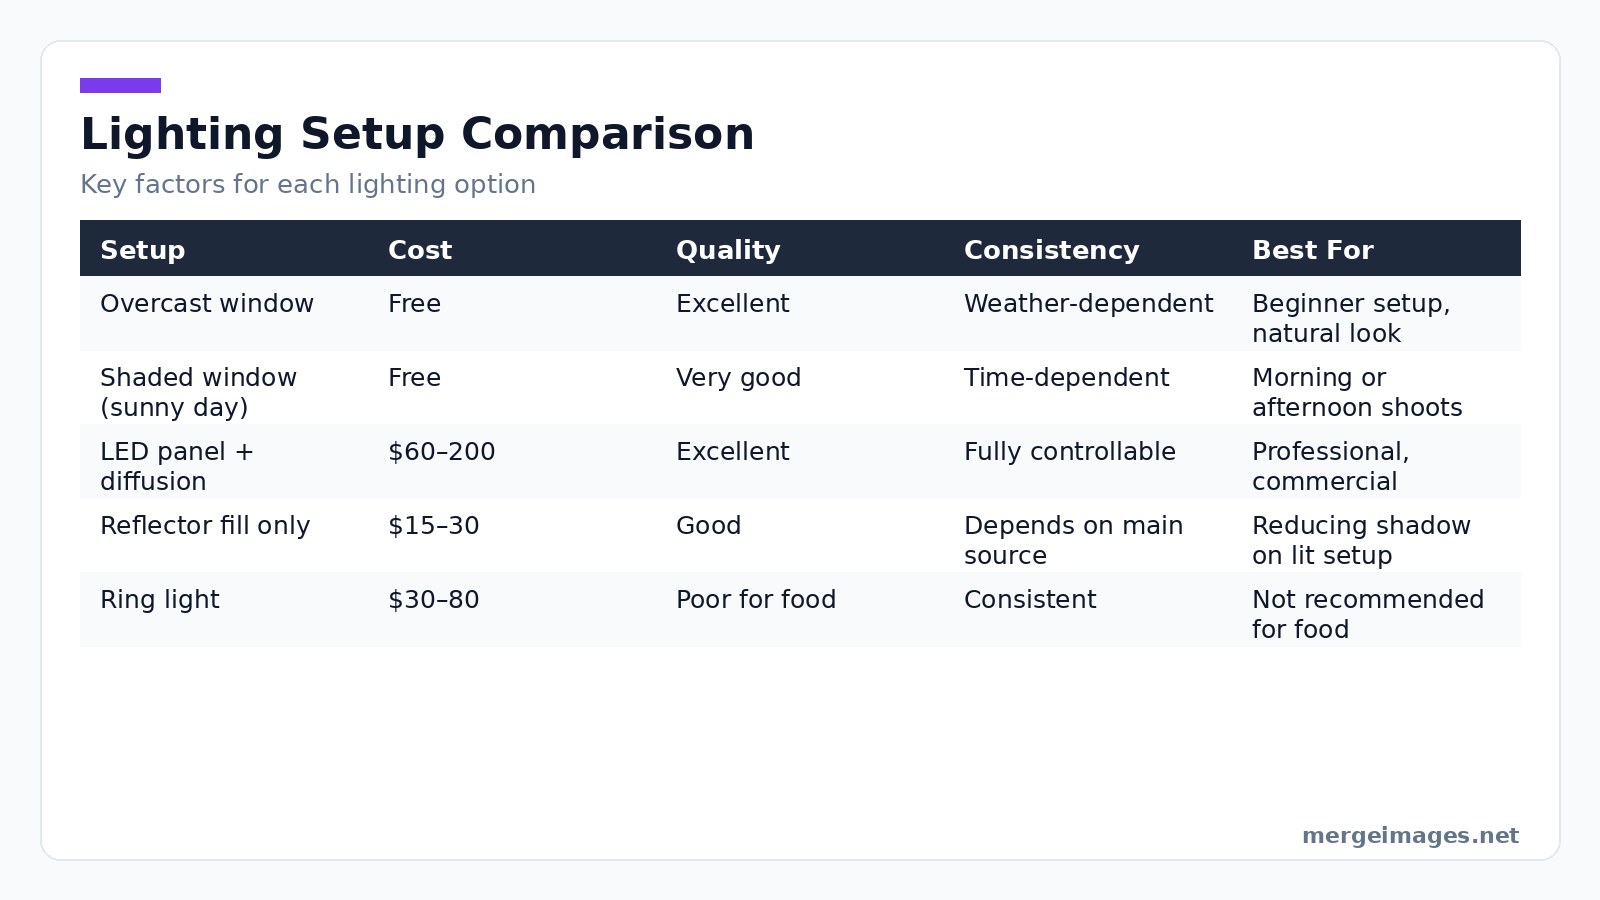
Lighting Setup Comparison
| Setup | Cost | Quality | Consistency | Best For |
|---|---|---|---|---|
| Overcast window | Free | Excellent | Weather-dependent | Beginner setup, natural look |
| Shaded window (sunny day) | Free | Very good | Time-dependent | Morning or afternoon shoots |
| LED panel + diffusion | $60-200 | Excellent | Fully controllable | Professional, commercial |
| Reflector fill only | $15-30 | Good | Depends on main source | Reducing shadow on lit setup |
| Ring light | $30-80 | Poor for food | Consistent | Not recommended for food |
Plating the Window Light
Put your subject 1-3 feet from the window. Your shooting position relative to the glass dictates the style.
Side lighting. Window left or right throws dramatic shadows that punch up texture. Prop a white foam board reflector on the opposite side. Bounce light until you reveal detail without killing the shadow entirely.
Backlit. Put the window behind the subject and face your camera toward it. This rim-light makes liquids glow. Expose for the food, not the bright background. The window will blow out to white. That is fine.
Front lighting. Stand with the window at your back facing the subject. You get flat, even light. Use this for overhead flat-lays where shadows would compete with the food.
Direct sunlight through a window creates contrast too harsh for food. Wait for cloud cover, hang a sheer white curtain, or tape up a diffuser sheet.
Styling That Sells the Bite
Pick your surface before anything else. It occupies 30-60% of most frames. Matte wooden boards, slate tiles, white marble, dark cement, or linen fabrics each create a distinct mood. Match the material to the meal. Rustic boards for comfort dishes. Clean marble for pastries. Dark slate for vibrant salads.
Understand the material rules. Matte surfaces eat light and rarely distract. Glossy surfaces throw reflections under almost any light. Always contrast the surface color against the food color. Never match it.
Props sell the story. Scatter a raw ingredient near the dish to hint at the recipe. Position a fork off-center to add scale. Drape a linen napkin casually for texture. Props support the narrative. They must never compete with the plate.
Styling by Food Category
| Food Type | Surface | Props | Lighting Style |
|---|---|---|---|
| Baked goods | Wood, linen | Flour dusting, rolling pin, scattered crumbs | Side lighting |
| Fresh salads | Marble, white | Lemon wedge, olive oil bottle | Backlit or side |
| Soups/stews | Dark slate | Crusty bread, spoon, herbs | Side lighting |
| Desserts | Marble, white | Powdered sugar, chocolate shavings | Soft front or side |
| Drinks | Glass, marble | Ice, mint, lemon slices | Backlit |
| Pasta | Wood | Scattered flour, parmesan block, basil | Side or backlit |
Angles That Frame the Bite
Overhead (90 degrees). Point the camera straight down. This handles charcuterie boards, pizzas, and grain bowls. You need a tripod with a horizontal arm or a remarkably steady hand.
45-degree angle. This is the natural perspective. It mimics how you actually see a dish at a table. It reveals the top and a partial front face. Use it as your safe starting point.
Eye level (0 degrees). Match the camera height to the food. Look horizontally. This serves layer cakes, burgers, sandwiches, and drinks where the profile defines the dish.
A dish that flops at one angle might sing at another. Shoot all three when time allows. Pick the strongest later.
Composition for the Plate
The classic rules still apply. Rule of thirds, leading lines, negative space. Apply them with food-specific twists. Place the main dish at a thirds intersection, never dead center. Leave breathing room in the direction the food faces. Use diagonal composition for flat lays. Arrange elements diagonally across the frame for dynamism. Leave one corner nearly empty to create a visual pause after the eye scans the plate. Use fresh herbs, scattered seeds, or drops of sauce as leading lines. Guide the viewer straight toward the main subject.
Post-Processing the Shot
Editing follows a predictable sequence. Food demands specific priorities.
- White balance first. Correct any color cast before other tweaks. Yellow casts make food look stale. Blue casts make it look cold.
- Exposure. Slightly bright images sell better. Protect highlights to avoid blown-out whites on plates.
- Vibrance. A moderate boost makes greens, reds, and oranges pop without looking artificial.
- Clarity/texture. A subtle increase sharpens crusts and crumb without over-sharpening.
- Selective adjustments. Raise greens on herbs. Deepen browns on baked goods. Brighten glaze highlights.
Need a quick lift? The Enhance Photo tool offers a one-click auto enhancement that applies the steps above in a balanced way. If the composition includes unwanted edges, the Image Cropper trims precisely to the desired frame. For overall exposure tweaks, the Brightness Image slider lets you raise or lower the whole image in seconds.
Building a Workflow
Consistency beats occasional brilliance. A repeatable workflow saves time and yields a cohesive visual brand.
- Set up light first, food last. Food degrades fast. Have your setup locked before plating.
- Shoot tethered if possible. Connect your phone or camera to a larger screen to review shots instantly.
- Shoot more than you think you need. Capture 15-20 frames per composition. Small variations often make the final pick.
- Edit in batches. Develop a single edit you love, then apply the same settings to related shots. Batch editing speeds up delivery.
Frequently Asked Questions
What's the best camera for food photography?
A smartphone with a good camera produces excellent food photography when lighting and styling are right. The iPhone 15 Pro, Google Pixel 9 Pro, and Samsung Galaxy S25 Ultra all deliver commercially usable results in good light.
Why do my food photos look dull even with good light?
The most common cause is a surface that matches the food tone, causing the subject to blend into the background. Choose a contrasting surface and add a modest vibrance boost in post-processing.
How do I photograph shiny or glossy food without reflections?
Diffuse your light as much as possible, angle the surface so reflections fall outside the frame, and consider a polarizing filter if your camera supports one.
How many photos should I take per dish?
Aim for 3-5 final images per dish. To achieve that, capture 30-50 shots; many will be slightly out of focus, poorly composed, or caught at an unflattering moment.
Do I need a reflector?
Yes. A white foam board reflector costs $2-3 and bounces fill light into shadow areas. Once you try shooting with and without a reflector, you won't go back.
The Bottom Line
Systems beat inspiration in food photography. A repeatable setup brings consistently better results than creative experimentation without a controlled baseline. Use the same window. The same surface. The same reflector position. Get the lighting right. Select surfaces with contrast to the food. Style minimally but thoughtfully. Finish with quick enhancements using free browser tools.

Bello builds useful software and writes thoughtful content to make sense of it all. He tests the tools himself and checks the facts before any of it goes in a guide.
Essayez Nos Outils d'Image Gratuits
Prêt à Essayer ?
Mettez ces conseils en pratique avec notre outil de fusion d'images en ligne gratuit. Sans inscription.
Fusionner des Images Maintenant


